%201-1.webp?width=148&height=74&name=our%20work%20(2)%201-1.webp)


Earlier, it was a tedious and time-consuming process to create a website. Moreover, you need to take the help of custom web development companies to develop a website for you.
Registering a domain, hosting a website, and configuring DNS settings were done through different companies. But, with AWS, you can easily create and maintain your website without spending much.
Why Should You Choose AWS for Domain Registration?
AWS offers a reliable and user-friendly domain registration service. By registering your domain on AWS, you can benefit from their robust infrastructure and extensive DNS management capabilities. This ensures that your domain is secure, easily configurable, and highly available to users.
You should consider hosting your WordPress website on Amazon Web Services only if you are developing a website that is expected to grow in size and complexity over time. You will require a huge infrastructure for your website as it will grow. AWS can provide all the necessary services for your website to function better.
You can easily use the AWS platform by yourself or you can contact an Amazon web services consultant. You just have to log in to AWS and sign in. Also, you can register a domain, transfer a website, and even migrate it to AWS with simple steps.
Here in this guide, we will take you through all the steps of registering, hosting, and migrating your website on AWS.
How to Host a Customized Website on Amazon S3?
Choosing the Right AWS Hosting Service
AWS offers a range of hosting services, each designed to cater to different needs. Depending on your website's requirements, you can choose from options like Amazon S3, Amazon EC2, AWS Lightsail, or AWS Elastic Beanstalk.
Amazon S3 for Static Website Hosting
Amazon S3 (Simple Storage Service) is an object storage service that can also be used to host static websites. If your website primarily consists of HTML, CSS, JavaScript, and media files that don't require server-side processing, Amazon S3 provides a cost-effective and efficient solution.
To host a static website on Amazon S3, follow these steps:
- First of all, visit https://aws.amazon.com/ and sign in by filling in the details.
- Now login to the AWS console, go to the services option and search for S3. To store your files in S3, you need to create a bucket. Buckets are nothing, but folders to save your files and you have to name them. By default, you can create up to 100 buckets. Make sure to give a unique name to your bucket.
- After this, you need to select a region where you want to store your data. Click next; You need to grant public access to the bucket. After this, you will be able to view the configuration of the bucket, review it, and then click on Create a bucket.
- Now you can upload your existing website to S3. Select the bucket name and look for the upload button on the top left. You can simply add the files or drag the files to the bucket. You can select your storage class and then click upload. Your files might take a couple of minutes to upload.
- Click on the static website hosting option, and then select Use this bucket to host a website. Click Save.
- Click on the static website option again. The endpoint will appear, and by clicking on it, you can check your website.
How to Register Your Domain on Route53?
Use Amazon Route 53 to register your domain on AWS. It can perform three functions;
- Registering domain names
- Routing Internet traffic to the resources for your domain
- Checking the health of your resources.
Check out the steps involved in registering your domain on AWS:
- First of all, log in to the AWS console and then go to services and look for Route 53.
- Now click the register domain option. Choose a domain name and look for availability. After selecting the domain name. Fill in your contact details and verify and purchase that domain.
- Once the domain is created, go to Create a host zones section and click on your domain.
- Now you need to create a record set for routing internet traffic to your CloudFront.
Before, this you need to specify a few things:
- Type. Select A – IPv4 address;
- Alias. Select Yes;
- Alias Target. Enter the domain name of your CloudFront distribution;
- Routing Policy. Leave the default value of Simple;
- Evaluate Target Health. Select No.
- Click Create.
Wait for a couple of minutes, and your traffic will be routed to CloudFront.
Amazon’s AWS makes creating and maintaining a website seem like a cakewalk. With this, you can effortlessly register a domain, host your website, and ensure fast load times via CloudFront.
Now, let’s talk about how to deploy a website on AWS.
Steps to Deploy the Website on AWS?
Deploying AWS on the website is efficient for small businesses since it gives your business access to a cloud wherein you can store your data, which saves time and money.
Below are the steps involved in deploying the website on AWS:
- The first step is to install WordPress on an AWS EC2 using a stack.
- You need to install stacks that are already configured by the company Bitnami. All you need to install them on your EC2 virtual machine.

Launch EC2:
- After creating an Amazon Web Services account, click the services at the top of the page and then search for EC2.
- From the EC2 dashboard, click on the Launch instance to deploy a new EC2 instance.
- Now as your EC2 has been deployed, then install WordPress.
- For this, you need to go to the AWS marketplace and then search for WordPress and select WordPress certified by Bitnami.
- View the details of the Bitnami WordPress page and click continue.
Choose the instance page:
- Select the instance ( virtual machine) hardware t2, a micromachine, if you want to use the free tier services.
Configure instance details:
- On the configure instance page, choose the Auto-assign Public IP option and leave the other fields as it is.
- Review instance details :
- After reviewing the details, click the Launch button.
Generate SSH Key:
- A popup window will appear, Create a new SSH key pair by the following pop-up window instruction. Also, download and save the key pair.
- Next, click the Launch Instances button.
Obtain WordPress credentials:
- To log in to your new WordPress installation, you need to obtain your WordPress credentials. You need to follow the below steps to get them.
- Click on the services at the top of the Launch Status page.
- Now, under the compute tab, click on the EC2 link
- After that, click on the instances link. On this page, click the Actions button, then go to settings and click on Get system Log.
- Navigate to the bottom of the Instance Log. Search and copy your Bitnami application password.
Copy external IP:
- Copy the password and exit out of the instance log and search for your public IP address and copy it.
Log in to WordPress:
- In the new window, paste the Pubic IP address followed by wp-admin. You will be directed to the WordPress login page. Enter the credentials, and here it is, you have successfully logged in to WordPress.
Your website is now deployed on Amazon EC2 and ready to serve dynamic content to users. AWS provides various tools and services to streamline the deployment process further, such as AWS Elastic Beanstalk and AWS CloudFormation.
Complete Guide to Register, Host, and Deploy Website on AWS Video
How much AWS Costs?
The best thing about AWS is the free tier. Amazon offers AWS a free tier, here a couple of AWS services are offered to the customers so that they get their hands on AWS.
AWS services are not heavy on your pocket. You can rent a server for low as $5 a month.
Pay as you go: You just have to pay for the services you use.
Billing per hour: AWS charges you per hour. So, you can use more AWS services and pay as per your hourly usage.
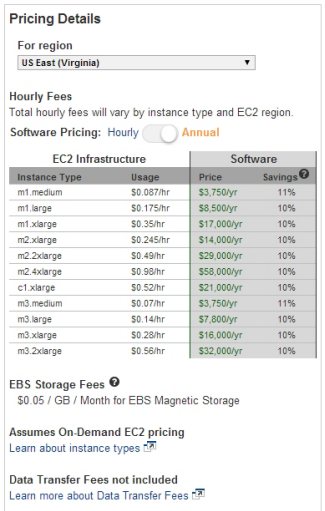
Save when you reserve: With Amazon EC2 and Amazon RDS you get an option to invest in reserved capacity. You can save up to 75% when you use reserved instances.
We hope this tutorial is helpful in registering, deploying, and hosting your website on AWS. If you need any help, we at Signity Solutions will help you in transferring your website to the AWS cloud. We have been creating custom web designs for companies for a long time.
Conclusion
Building and deploying a website on AWS is a powerful way to establish a robust online presence. By following the steps outlined in this complete guide, you can register a domain, host your website, and deploy it using AWS's comprehensive suite of services. Whether you're a business owner, a developer, or an individual looking to showcase your work, AWS offers the tools and scalability needed to ensure your website's success.
Frequently Asked Questions
Have a question in mind? We are here to answer.
Can I register a domain on AWS if I already have a website hosted elsewhere?
![]()
Is it possible to host a WordPress website on AWS?
![]()
Yes, hosting a WordPress website on AWS is a popular choice. You can utilize services like Amazon EC2, AWS Lightsail, or AWS Elastic Beanstalk to host your WordPress installation.
How much does it cost to host a website on AWS?
![]()
Can I use my own SSL certificate for secure website hosting on AWS?
![]()
Can I scale my website hosted on AWS to handle increased traffic?
![]()
Yes, one of the key advantages of AWS is its scalability. You can utilize services like AWS Auto Scaling to automatically adjust resources based on traffic patterns, ensuring optimal performance for your website.
Can I use AWS to host an e-commerce website?
![]()