%201-1.webp?width=148&height=74&name=our%20work%20(2)%201-1.webp)


In today's digital age, incorporating social media elements into your blog posts can greatly enhance their reach and engagement. Pinterest, being a visual discovery platform, can drive valuable traffic to your blog if utilized effectively. One way to achieve this is by adding a Pinterest 'Pin It' button to your HubSpot blog posts. This button allows your readers to easily share your content on their Pinterest boards, expanding its visibility and potential audience.
In this guide, we'll walk you through the steps of adding a Pinterest 'Pin It' button to your HubSpot blog post.
Step 1: Publish Your HubSpot Blog Post
Before you can add the Pinterest 'Pin It' button, ensure that you have successfully published your blog post on the HubSpot platform. This will provide you with the URL that you'll need for the next steps.
Step 2: Access Pinterest Widget Builder
- Open your web browser and navigate to the Pinterest Widget Builder page.
- Choose the "Save" button option among the widget types available.
Step 3: Configure the Pinterest Button
- Paste your HubSpot blog post's URL into the "URL to save" field. This ensures that when readers click on the 'Pin It' button, it will pin the correct blog post image and description.
- Customize the "Image URL" with the URL of the image you want to appear when the content is pinned. This should be a captivating and relevant image from your blog post.
- Enter a "Description" that succinctly explains the essence of your blog post. This will accompany the pinned image on Pinterest.
Step 4: Generate the Code
- Click the "Build It" button after configuring the button settings.
- The Pinterest Widget Builder will generate a code snippet. Copy this code to your clipboard.
<a class="pinterest" href="//www.pinterest.com/pin/create/button/?url=https://www.signitysolutions.com/hubspot-knowledge-base/add-a-pinterest-pin-it-button-to-your-blog-post&media=https://22675444.fs1.hubspotusercontent-na1.net/hubfs/22675444/Hubspot%20KB.png" data-pin-do="buttonBookmark" ><img src="//assets.pinterest.com/images/pidgets/pinit_fg_en_rect_gray_20.png" /></a>
Step 5: Add the Code to Your HubSpot Blog Post
- Go back to your HubSpot account and navigate to the specific blog post where you want to add the 'Pin It' button.
- Edit the post or create a new module where you want the button to appear.
- Click the "+" icon to add a new element and choose the "Custom HTML" option.
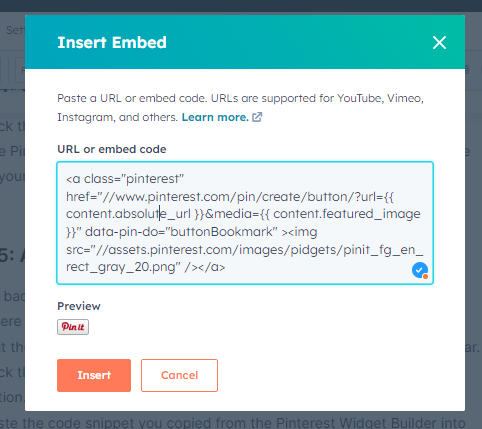
- Paste the code snippet you copied from the Pinterest Widget Builder into the HTML editor.
Step 6: Save and Preview
- After adding the code, save your changes.
- Preview your blog post to see how the Pinterest 'Pin It' button appears. Make sure it's positioned conveniently for your readers to access.
Step 7: Publish Your Changes
Once you're satisfied with the placement and appearance of the 'Pin It' button, publish your changes to make the button live on your HubSpot blog post.
Conclusion
By adding a Pinterest 'Pin It' button to your HubSpot blog post, you're empowering your readers to amplify your content's reach on one of the internet's most popular visual platforms. Following these simple steps, you can seamlessly integrate this button and encourage your audience to share your valuable content with their Pinterest followers. This not only enhances engagement but also drives more traffic to your blog, increasing its overall visibility and impact.


.jpg?width=352&name=_Choose%20the%20Best%20HubSpot%20Consulting%20Services%20(1).jpg)