
%201-1.webp?width=148&height=74&name=our%20work%20(2)%201-1.webp)


After setting up your blog, you can generate blog posts. These posts can be initiated from the ground up or imported from an external blog or Google Doc. You can personalize the content and configuration of your blog and fine-tune your blog posts to enhance their search engine optimization.
Create Blog Post
- Go to Marketing > Website > Blog in your HubSpot account.
- Click Create in the upper right, then choose Blog post.
- Select a blog from the dropdown menu and click Create a blog post.
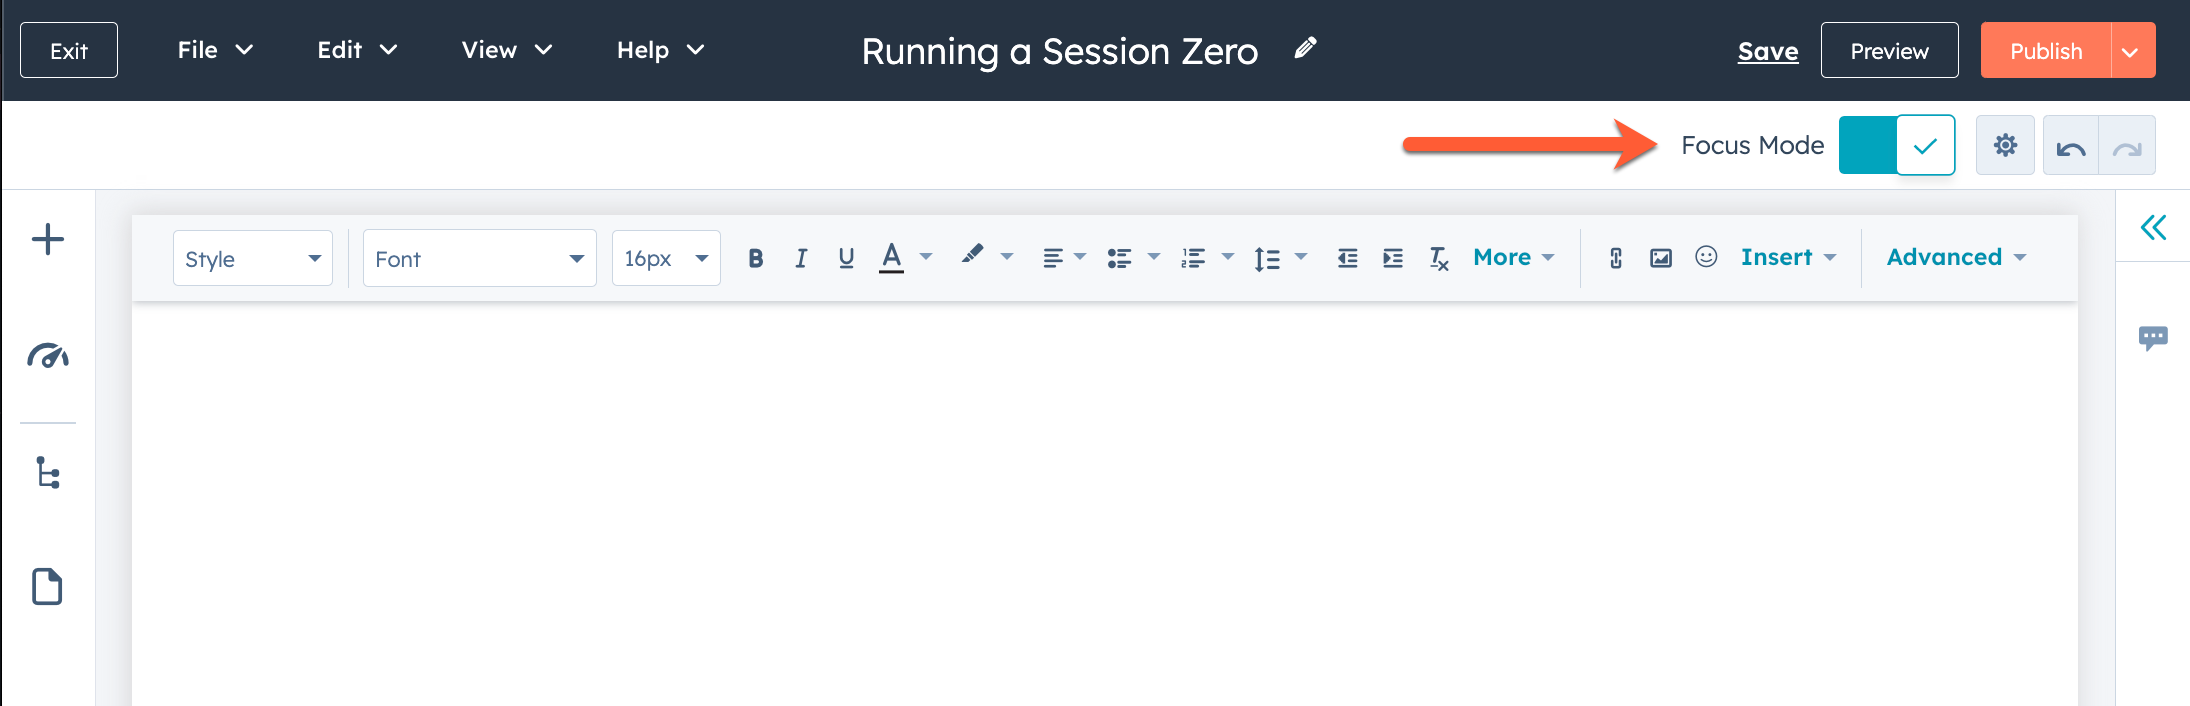
- Add content using the Blog post body module in the content editor. Format your content using the rich text toolbar.
- Toggle on Focus Mode for a streamlined editing environment.
- Set the post summary length with a readmore separator:
- Click the Blog content module.
- In the rich text toolbar, choose Insert > Read more separator.
- Drag the separator to your desired position in the blog post.
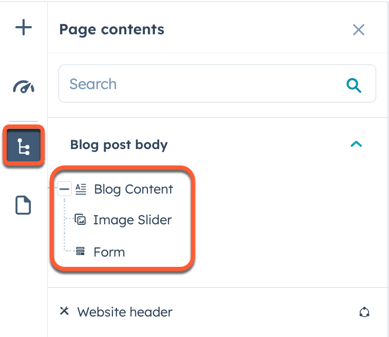
- Add more modules to the Blog post body module:
- In the left sidebar, click the +Add icon.
- Select Modules > All.
- Drag and drop a module over the Blog post body module to add it.
- To edit a module within the Blog post body module, use the siteTree Contents icon in the left sidebar, then select the module.
Edit Blog Post Settings
With HubSpot management tools now more robust than ever, businesses can streamline their processes.After modifying your blog post content, you can personalize page elements such as the URL slug, meta description, and language settings.
Customize Basic Post Settings
- Go to Marketing > Website > Blog.
- Hover over the post and click Edit.
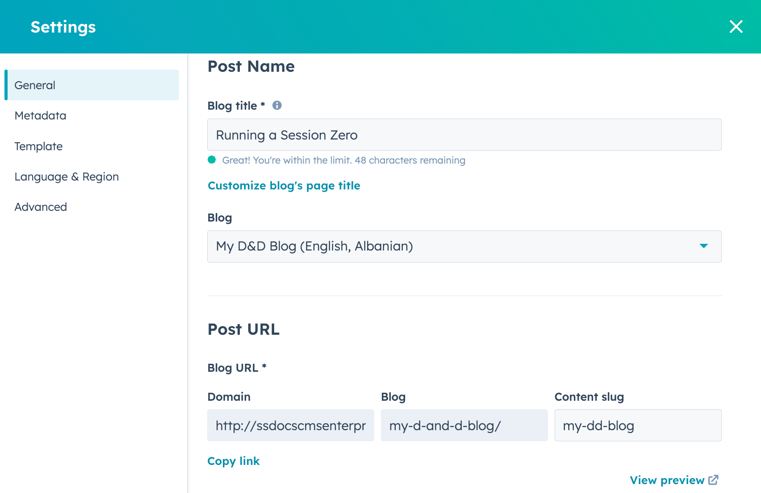
- In the content editor, click File > Blog settings.
- In the field labeled "Blog title" input the title of your blog post. This title will be visible in the h1 tag at the top of the post, as the tab name in the visitor's browser, and in search results.
- Select Customize blog's page title in browsers and search results to distinguish the page's title and h1 tag from the page name.
- In the "Blog title" field, add the h1 tag title for the page.
- In the "Page title" field, insert the name for the browser title bar and search results.
- To relocate the post to another blog, use the Blog dropdown menu and publish. The URL will automatically update with a redirect from the old URL.
- To change the post's URL, edit the Content slug field. For details, refer to the guide on editing blog post URLs.
- To assign an author, choose one from the Author dropdown. Explore further in the blog author management guide.
- To add tags, select existing ones from the Tags dropdown or create a new tag by typing its name and clicking "Add [tag name]." Get more information on managing blog tags.
Set the Featured Image
To include a featured image for social media sharing:
- Go to Marketing > Website > Blog in HubSpot.
- Hover over a post and click Edit.
- In the content editor, select File > Blog settings.
- In the dialog box, click the Featured image in the left sidebar.
- Enable the featured image by toggling the switch on.
- Upload an image from your system or choose one from the files tool.
- Enhance accessibility by adding an image description in the Image alt text field.
Set Meta Description and Campaign
- Go to Marketing > Website > Blog.
- Edit a post by hovering over it.
- In the content editor, select File > Blog settings.
- Click Metadata in the left sidebar.
- Enter a description in the Meta description domain for search results.
- To link to a campaign, use the Campaign dropdown or choose Add New to create a new campaign.
Manage Blog Templates
- Visit Marketing > Website > Blog.
- Edit a post by hovering over it.
- In the content editor, select File > Blog settings.
- Click Template in the left sidebar.
- To change the template for blog posts, click "Change template for this blog."
Note: Changing the template affects all posts in that blog, not individual ones.
To edit the blog post template, choose "Edit this template."
- Use the Actions dropdown for the blog listing template and select "Change template."
- If it's editable, click "Edit page" to make changes in the content editor.
Set Post Language
- Go to Marketing > Website > Blog.
- Edit a post by hovering over it.
- In the content editor, select File > Blog settings.
- Click Advanced in the left sidebar.
- To change the post's language, use the Blog post language dropdown.
- Explore more about creating posts in multiple languages.
Manage Advanced Post Settings
- Visit Marketing > Website > Blog.
- Edit a post by hovering over it.
- In the content editor, select File > Blog settings.
- Click Advanced in the left sidebar.
- Use the Head HTML field to insert code in the post's Head HTML.
- For domain-wide code, adjust your website settings.
- Modify the blog's subscription email settings by clicking Manage in the Notification Emails section.
- To set a custom canonical URL, enter it in the Customize canonical URL field. Explore more on canonical URLs.
Publish Posts
- Go to Marketing > Website > Blog.
- Edit a post by hovering over it.
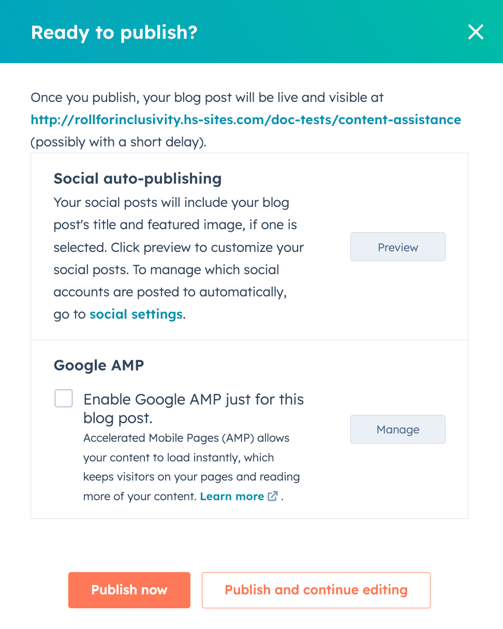
- To publish immediately, click "Publish" in the top right.
- For social sharing, click "Preview" in the dialog box to adjust how the post appears on social media. Edit text and images in the right panel, then Save.
- To enable Google AMP for this post, select the checkbox if available.
- In the dialog box, click "Publish now."
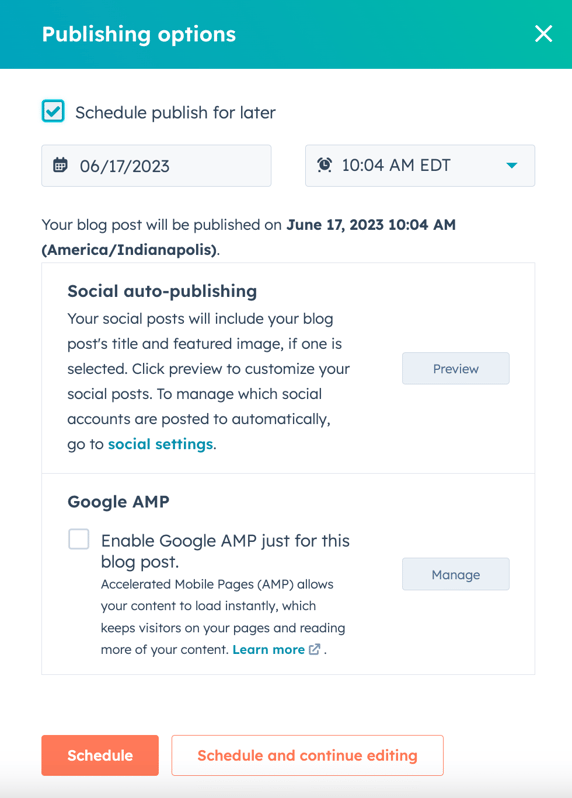
- To schedule a page for later publishing:
- Click the dropdown menu next to the Publish button in the top right, then select Publishing options.
- Check the "Schedule publish for later" option in the dialog box.
- Set the publication date and time.
- For social sharing, click "Preview" to adjust how the post appears on social media.
- To enable Google AMP for this post, select the checkbox if available.
- Click "Schedule" to set the publication date, or click "Schedule and continue editing" to schedule and return to the content editor.
Import Blog Content From Google Docs
To import blog content from a Google Doc:
- Go to Marketing > Website > Blog in HubSpot.
- Edit an existing blog post or start a new one.
- In the content editor, select the Blog content module.
- Click "Advanced" in the text toolbar and choose "Import Google Doc."
- To choose a Google Doc from your Drive:
- If your Google account isn't visible, connect a new account and follow the authorization steps.
- In the "Select the Google account" section, pick the connected account that owns the Google Doc.
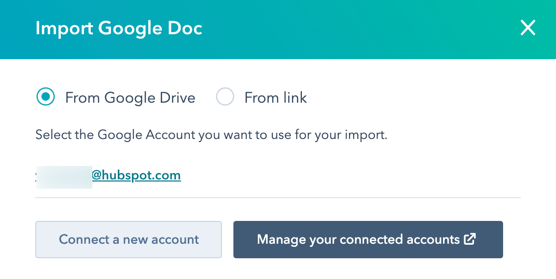
- Select the desired Google Doc in the dialog box and click "Select."
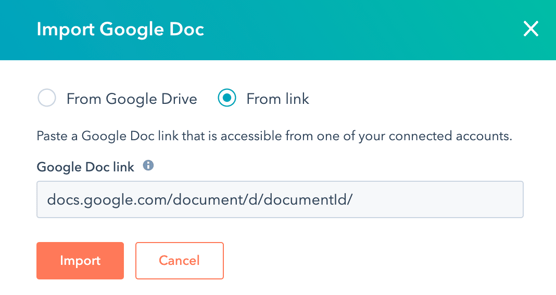
- To import a Google Doc using a link:
- Choose the "From link" option in the dialog box.
- Paste the Google Doc URL in the "Google Doc link" field. It should be in the format docs.google.com/document/d/documentId/ or drive.google.com/open?id=documentId.
- Click "Import."
- In the content editor, complete your blog post.
Note: Imported Google Docs content retains some original formatting. Learn more about importing formatting from Google Docs.
- To make your changes live, click "Publish" or "Update" in the top right, then choose "Publish now" or "Update now" in the dialog box.
Optimize Posts for Search Engines
In the sidebar editor's "Optimize" section, access SEO recommendations and topic attachments.
- To find your content:
- For Website Pages, go to Marketing > Website > Website Pages.
- For Landing Pages, visit Marketing > Landing Pages.
- Edit a post by hovering over it.
- In the content editor, click the gauge icon in the left sidebar labeled "Optimize."
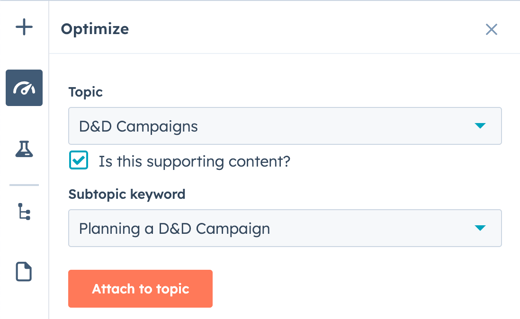
- To connect content to a topic:
- For an existing topic, choose it from the Topic dropdown menu.
- To create a new topic, select "Add core topic" from the Topic dropdown, enter it in the dialog box, and save it.
To link the post to a subtopic keyword:
- Check "Is this supporting content?"
- Pick a subtopic keyword from the Subtopic keyword dropdown.
- To create a new keyword, choose "Add subtopic keyword" from the dropdown, enter it in the dialog box, and save it.
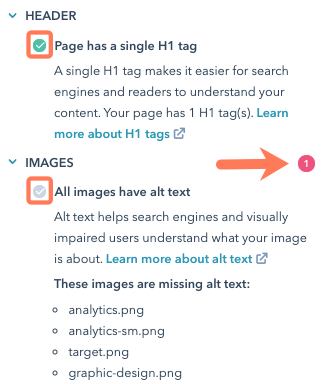
- To see unfinished SEO tips, click on categories with a red circle. Completed recommendations have green checkmarks, while incomplete ones have grey checkmarks. Explore more on SEO recommendations.
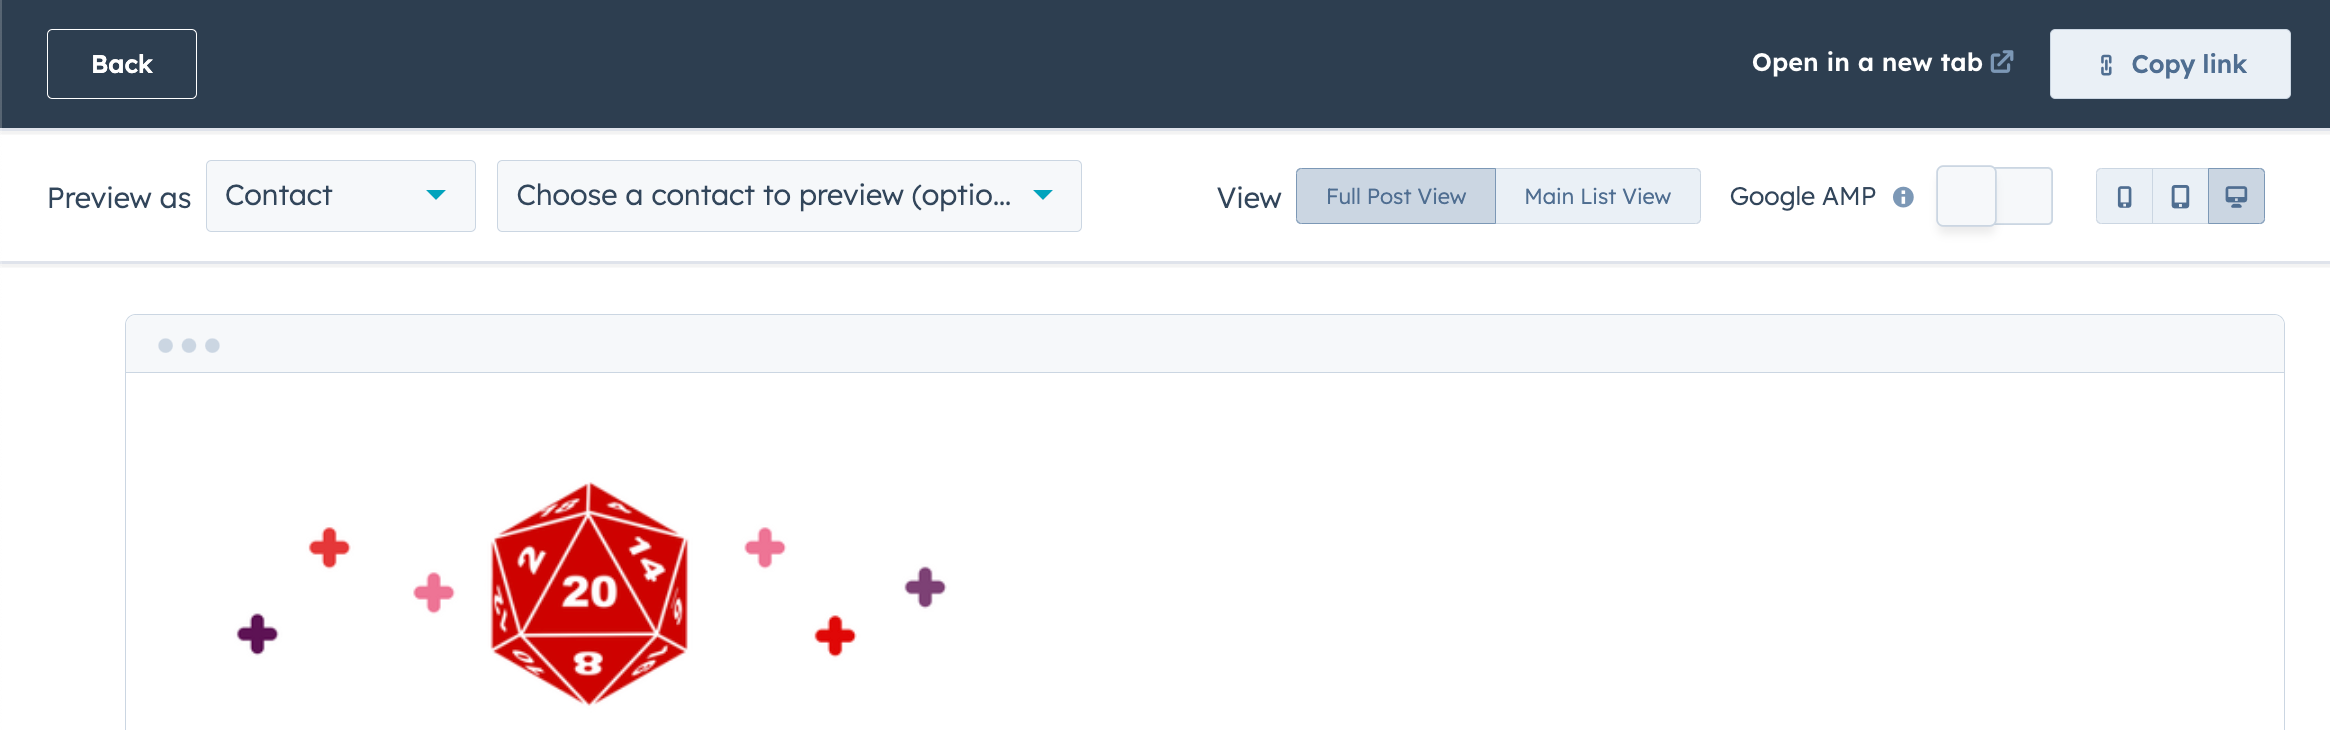
Preview Blog Posts
Before posting, you can review your content on various device types and evaluate smart content and personalization features.
- Go to Marketing > Website > Blog in HubSpot.
- Edit a post by hovering over it.
- In the content editor, click "Preview" in the top right.
- For a full-page preview, click "Open in a new tab" (and copy the link for sharing).
- To preview on different devices, click mobile icons at the top.
- If Google AMP is enabled, switch between AMP and standard views.
- To preview listing and full post views, use the "View" section.
- Select "Contact" to preview personalization for a specific contact.
- Choose "Smart rule" to preview smart content for visitors matching specific rules.For personalization or smart content, choose from the "Preview as" dropdown menu:


.jpg?width=352&name=_Choose%20the%20Best%20HubSpot%20Consulting%20Services%20(1).jpg)


