%201-1.webp?width=148&height=74&name=our%20work%20(2)%201-1.webp)


Use HubSpot's URL redirects tool to redirect traffic between URLs on your domain. You can choose standard redirects for one-to-one redirection or flexible redirects to update URL structures. To add a redirect:
Open your HubSpot Account settings
Begin by accessing your HubSpot account settings, the central hub where you manage various aspects of your HubSpot tools and configurations. These settings provide the control and customization needed to enhance your website's performance and user experience.
Go to Website > Domains & URLs
Within the expansive range of HubSpot features, find the "Website" section integral to shaping your online presence. Once inside, navigate further into the "Domains & URLs" subsection, where you wield the power to manage the URLs associated with your website domains.
Click URL Redirects
Within the "Domains & URLs" section, discover the pivotal tool labeled "URL Redirects." By clicking on this tool, you unlock the ability to seamlessly guide and manage the flow of web traffic, an essential strategy for optimizing user interactions and maintaining a smooth user journey.
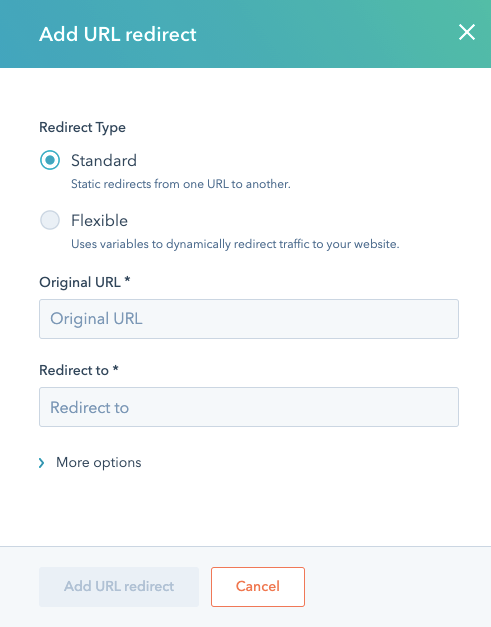
Select Standard/Flexible Redirect
Tailor your redirection strategy to your specific needs by choosing between two redirection options: "Standard" and "Flexible." The "Standard" redirect is your choice for straightforward one-to-one redirection, while the "Flexible" option empowers you to update URL structures dynamically to enhance user experience and navigation.
Enter the Original URL and Redirect the URL
In the redirection process, precise input is critical. Enter the "Original URL" from which you intend to redirect traffic. Then, specify the "Redirect URL," the destination you want visitors to be directed to. This meticulous input ensures that users are seamlessly guided to the desired destination.
Click Add URL redirect
Once you've configured the redirection details to your satisfaction, solidify your choices by clicking the "Add URL redirect" button. This step activates your redirection, making it effective and ensuring incoming traffic follows the designated path.
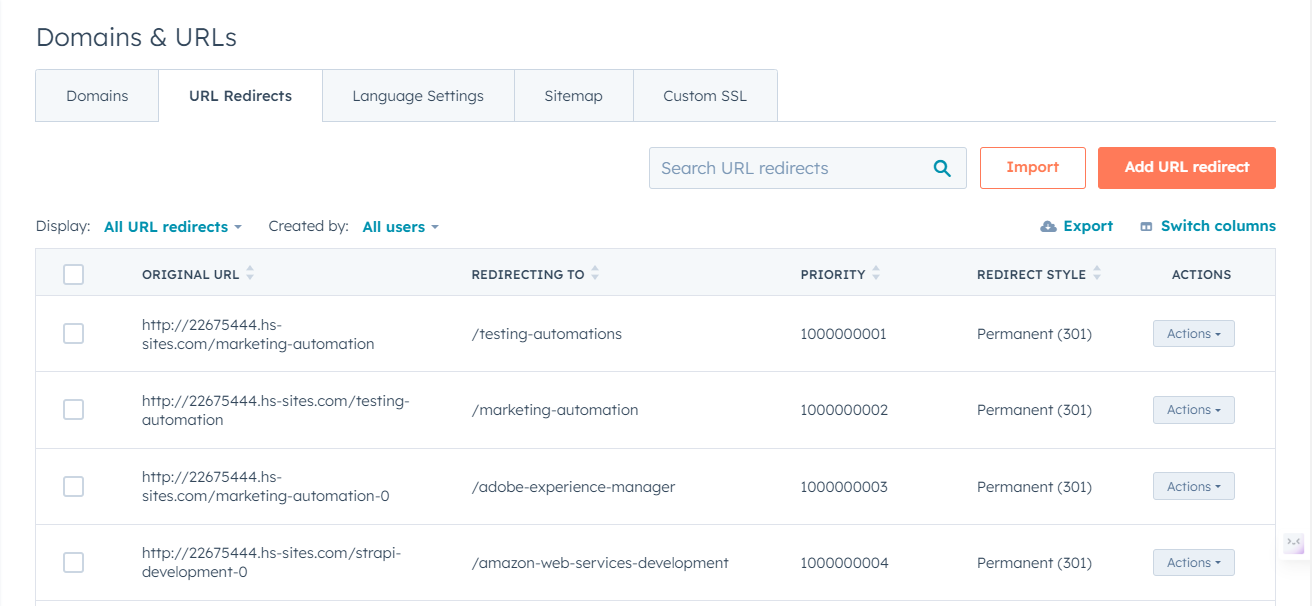
Manage URL Redirects
Use the Display Dropdown to filter between Manual and System Redirects
This feature allows you to categorize redirects based on whether they were manually created or automatically generated by the system, aiding in organized management.
Use the Created by Dropdown to See Redirects by a Specific User
This option enables you to filter and view redirects that were specifically created by a chosen user, simplifying tracking and oversight of redirect activity.
Search for Redirects Using the Search Bar
Quickly locate specific redirects by entering relevant keywords, URLs, or terms in the search bar, streamlining the process of finding the desired redirections.
Export all Redirects as a CSV File by Clicking Export
Quickly generate a downloadable CSV file containing all redirect data, providing a comprehensive record for analysis and management purposes.
Customize Displayed Fields with Switch Columns
Tailor the information shown in the redirect list by toggling the visibility of specific columns, allowing you to focus on relevant details for efficient management.
Edit by Selecting "Edit" from the Actions Menu
Modify existing redirects by choosing the "Edit" option from the Actions menu, allowing you to update redirection details as needed.
Delete by Selecting "Delete" From the Actions Menu
Remove unwanted redirects by opting for the "Delete" option from the Actions menu, facilitating the removal of unnecessary or outdated redirections.
Customize a URL Redirect's Advanced Options
- Click More options while creating/editing a redirect.
- Redirect Style: Choose between Permanent (301), Temporary (302), and Proxy redirects.
- Priority: Adjust priority for redirect conflict resolution.
- Match Query Strings: Decide whether to include additional parameters in the redirect.
- Ignore Trailing Slash: Choose if the redirect works with or without a trailing slash.
- Ignore Protocol: Decide whether to redirect regardless of http:// or https://.
- Disable for Existing Page: Choose whether to apply redirects for unpublished URLs.
- Explain Purpose: Add a note explaining the redirect's purpose.
- Click the Update URL redirect to save changes.

In conclusion, mastering HubSpot's URL redirect tools enhances website navigation and user experience. Utilize Display, Created by, search, and CSV export for efficient management. Customize views, edit, and delete redirects seamlessly. Explore advanced options for precise control. Elevate your URL management with HubSpot's versatility, optimizing website impact.


.jpg?width=352&name=_Choose%20the%20Best%20HubSpot%20Consulting%20Services%20(1).jpg)