%201-1.webp?width=148&height=74&name=our%20work%20(2)%201-1.webp)


Embarking on the journey of setting up workflow branches in HubSpot is a stride towards refined automation and precision in your marketing strategy. As we navigate through HubSpot's branching capabilities, we will explore diverse types of branch logic, each offering unique ways to tailor and refine your marketing strategies.
From configuring branches based on specific property values to conducting A/B testing through random splits, HubSpot's CRM features empower you to execute your marketing vision with finesse. Let's delve into the dynamic world of workflow branches and discover how these tools can elevate your marketing game.
Before You Dive into Workflow Branches
Before embarking on the journey of setting up your workflow branches in HubSpot, consider the following recommendations to ensure a seamless and effective automation experience:
1. Consider Analytics Delays:
- If your branch criteria hinge on analytics, such as page views, it's advisable to incorporate an 80-minute delay before activating the branch.
- This delay allows ample time for HubSpot's analytics to update, ensuring your decision-making is based on the most current data
2. Factor in Engagement Delays:
- When your branch criteria rely on a contact or associated contact engaging with content in a previous workflow action (e.g., opening a marketing email), introducing a delay before the branch is crucial.
- This delay provides the necessary time for contacts to interact with your content before the workflow progresses.
- Ensuring that your contacts have sufficient time to engage enhances the accuracy and relevance of your branching decisions.
3. Navigate Multi-Checkbox Challenges:
- If you're using a Value equals branch with criteria based on a multi-checkbox type property, and your record possesses more than one value, careful consideration is needed.
- In such cases, the record may proceed down the "None met" branch as it does not constitute an exact match.
- Instead, opt for an if/then branch and select the "is any of" criteria for more precise handling of multi-checkbox scenarios.
By keeping these recommendations in mind, you set the stage for a well-optimized and error-resistant workflow.

Types of Branch Logic in HubSpot Workflows
In the realm of HubSpot workflows, the versatility of branches shines through, allowing marketers to tune their automation strategies finely. Let's explore the various types of branch logic that can be employed to create dynamic and targeted workflows:
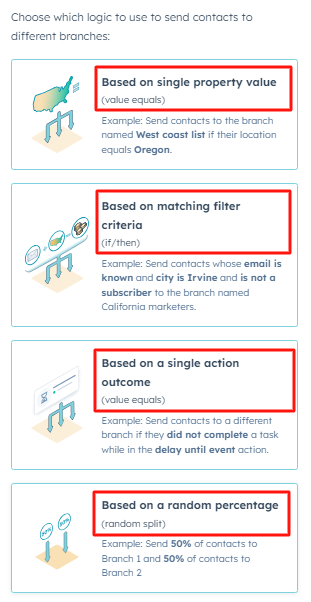
1. Based on Single Property Value (Value equals):
- Automatically configure multiple branches based on specific property values.
- This type of branch, however, cannot be configured with AND and OR criteria.
2. Based on Matching Filter Criteria (If/then):
- Manually configure multiple branches, incorporating properties, activities, and more.
- Configurable with AND and OR criteria for detailed filtering of enrolled records.
- Up to 20 unique branches can be created.
3. Based on a Single Action Outcome (Value equals):
- Automatically configure branches based on the status of a single action from earlier in the workflow.
4. Based on a Random Percentage (Random Split): (Available in Marketing Hub Professional or Enterprise only)
- Randomly split enrolled records into evenly sized groups for workflow experimentation.
Understanding these types of branch logic opens up a spectrum of possibilities for creating workflows that adapt to the unique characteristics and behaviors of your contacts.

Adding a Branch to Your HubSpot Workflow
Enhancing your workflow with a branching strategy can significantly elevate your automation game. Follow these steps to add a branch action to your workflow seamlessly:
1. Navigate to the Workflow Editor:
- In your HubSpot account, head to Automation > Workflows.
- If you're editing an existing workflow, hover over the workflow of choice and click Edit.
2. Initiate the Branch Addition:
- Click on the + plus icon to introduce a new action into your workflow.
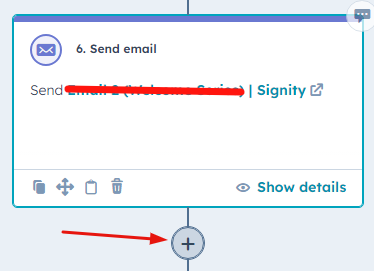
- Look for the "Branch" option in the left panel and select it to begin configuring your branching logic.
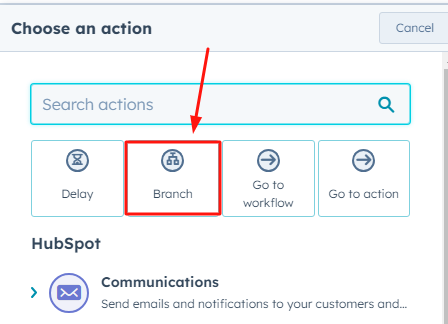
3. Select the Type of Logic:
- Choose the type of logic that aligns with your workflow goals. HubSpot offers several options:
- Based on single property value (Value equals)
- Based on matching filter criteria (If/then)
- Based on single action outcome (Value equals)
- Based on a random percentage (Random split) – Exclusive to Marketing Hub Professional or Enterprise
4. Configure the Chosen Branch Type:
- Depending on your selected logic, configure the branch by setting up the conditions specific to that logic type.
- For "Value equals" and "If/then" Branches: Define the criteria based on your chosen properties or filter conditions.
- For the "Random split" Branch: Specify the percentage split for your enrolled records.
By following these steps, you empower your workflow with intelligent decision-making, tailoring the user journey based on the specified conditions.
Whether you're steering contacts through a lead rotation, segmenting based on engagement, or experimenting with diverse strategies, adding a branch to your HubSpot workflow is a key step toward a more personalized and effective marketing approach.
Configuring Different Types of Branches in HubSpot Workflows
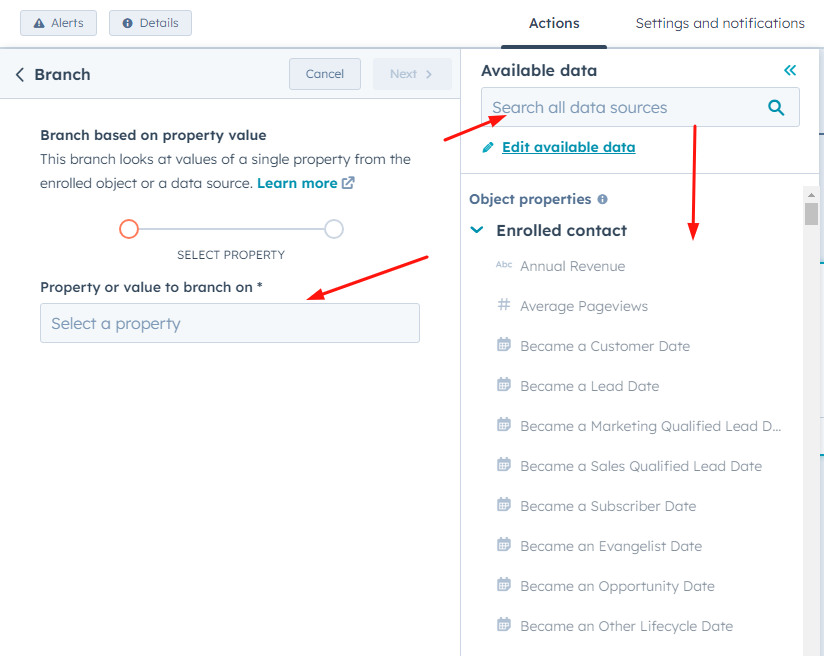
1. Based on Single Property Value Branch:
- Click the Property or Value to branch on the dropdown in the left panel.
- Select a property and choose criteria.
- For checkbox or select-type properties, check "Create a separate branch for each value."
- Add or remove branches using the + Add a branch and delete icons.
- Click Save to see the branch in your workflow preview.
2. Based on Matching Filter Criteria Branch:
- Enter a name in the Branch name field.
- Click + Add filter to set filter criteria.
- Add multiple branches with Add another branch.
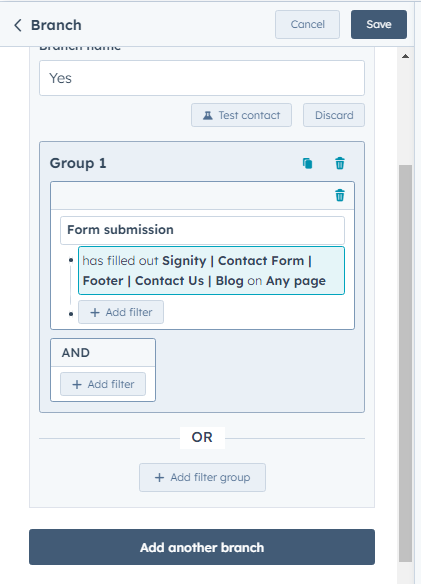
- Reorder branches by dragging or using the More dropdown.
- Clone or delete branches as needed.
- Save to see the branches in your workflow preview.
3. Based on Single Action Outcome Branch:
- Click the Property or Value to branch on the dropdown.
- Select a property and set criteria.
- For checkbox or select-type properties, choose "Create a separate branch for each value."
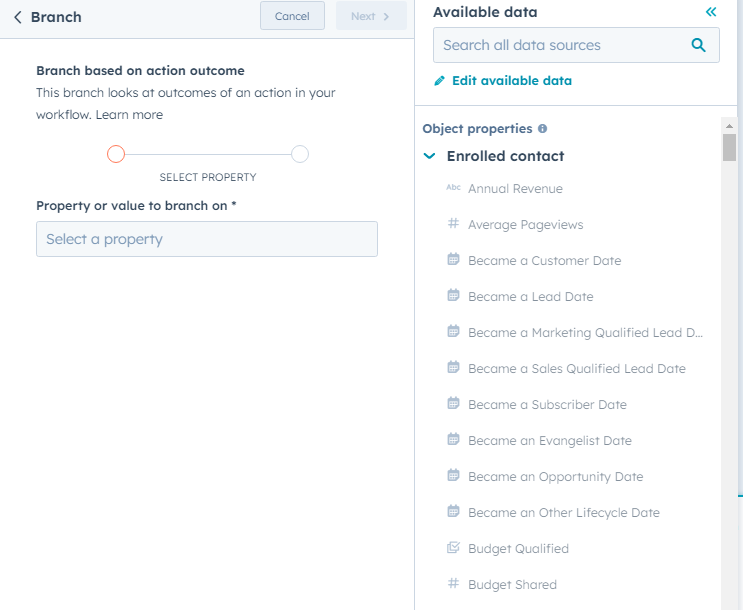
- Add or remove branches using the + Add a branch and delete icons.
- Save to view the branch in your workflow preview.
4. Random Split Branch (Marketing Hub Professional or Enterprise):
- Select the number of branches for desired segments.
- Further split distribution with + Add a branch.
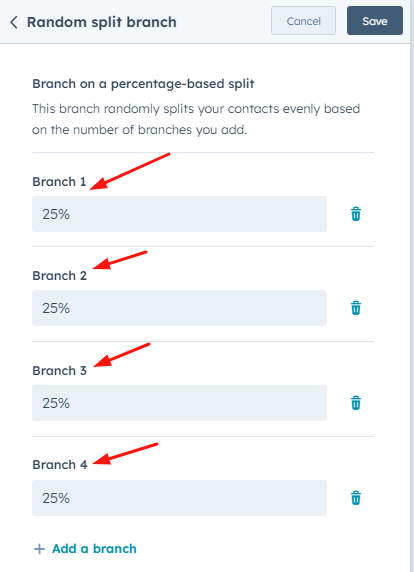
- Delete branches using the delete icon.
- Save to visualize the split in your workflow preview.
By following these concise steps, you can efficiently configure various branches within your HubSpot workflows, enhancing automation precision and achieving tailored marketing outcomes.
Adding Actions After Setting Up Branches in HubSpot Workflows
Once your branches are configured, the next step is to add actions below each branch to guide the workflow's progression. Follow these steps to integrate actions into your workflow seamlessly:
1. Adding Actions:
- Click the + plus icon to introduce actions under either the YES or NO branches.
- In the example, if a contact fills out a specific campaign form, they follow the YES path; otherwise, they take the NO path.
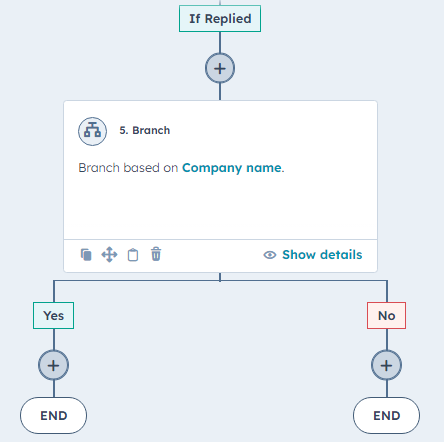
- Add more actions using the + plus icon if necessary, and the workflow concludes after the last action in the branch.
2. Testing the Branch:
- Test all workflow actions to observe how a record navigates through your established branches.
3. Cleaning Up Your Branches:
- HubSpot provides suggestions for optimizing branch structures. Alerts may appear when adding branches, indicating alternative options.
- To review proposed improvements, click Clean up in the top left.
- Assess the suggested changes to your branches.
- To accept a suggested change, click Accept changes.
With the help of Hubspot Marketing Automation seamlessly incorporating actions into your workflow and utilizing testing and cleanup functionalities, you ensure that your branches not only guide contacts effectively but also maintain an optimized and efficient structure.
Frequently Asked Questions
Have a question in mind? We are here to answer. If you don’t see your question here, drop us a line at our contact page.
What are the Benefits of using branches in HubSpot workflows?
![]()
Branches enable personalized and targeted marketing automation, leading to more effective lead nurturing, customer engagement, and higher conversion rates. They also streamline and automate marketing processes, saving time and resources.
How do I add a branch to the workflow?
![]()
-
Access the Workflow Editor: Navigate to the specific workflow you want to edit within your HubSpot account. Click on the "Edit" or "Create" button to enter the workflow editor.
-
Add a Branch: Once inside the workflow editor, you can add a branch by clicking on the "Add action" button and selecting "Branch" from the options provided.
-
Specify the Branch Logic: After adding the branch, you will define the specific logic for the branch. This could include conditions based on property values, filter criteria, action outcomes, or random splits, depending on your specific requirements.
-
Configure the Branch: Configure the branch by setting the criteria and actions that will follow based on the specified logic. This could involve setting up different paths, actions, or conditions for contacts that meet the defined criteria.
What are the types of workflows in HubSpot?
![]()
- Contact-based workflows.
- Company-based workflows.
- Deal-based workflows.
- Ticket-based workflows.
- Quote-based workflows.