%201-1.webp?width=148&height=74&name=our%20work%20(2)%201-1.webp)


Are you looking for a way to enhance customer service and convert leads? Chatbots may be precisely what your business is missing! It is more than a trick to show how advanced your company is. They have become an excellent tool for improving and accelerating customer service processes.
Hence, it is no wonder that the chatbot market will reach $454.8 million by 2027.
In the simplest terms, a chatbot is an AI-based tool. It consists of pre-programmed and written responses to stimulate conversation. It also offers self-service solutions depending on the information it gets without any human intervention.
And that is not even what the chatbot technology can do! Some chatbots are incredibly complex and almost impossible to distinguish from a human. While it may sound terrifying, you can benefit from these bots to flourish your business.
Studies show chatbots now handle entire conversations almost 69% of the time.
Are you planning to leverage the promising technology to enhance the customer experience? The intuitive and user-friendly HubSpot chatbot platform is the answer! Now don’t let the thought of developing a chatbot overwhelm you. This article will outline the entire process for you!
Step-by-Step Process to Create Chatbots in HubSpot
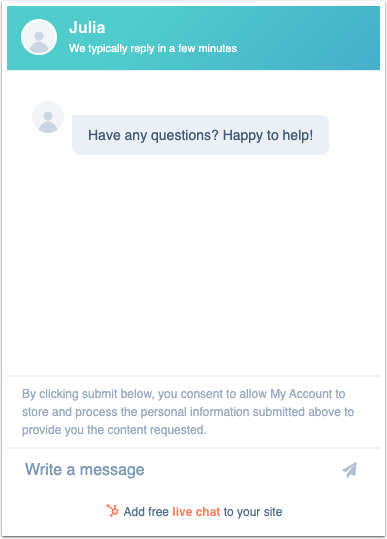
HubSpot enables you to create a chat flow and engage with visitors using a bot. Chatbot appears as a chat widget on the website where users can interact with you or your team.
It helps you capture leads, schedule meetings, and create a support ticket to address issues. There is more; you can leverage the bot to gather information about a user before initiating the conversation. Sounds nice?
Well, the simplified HubSpot chatbot creation will make it more fascinating.
Here is a detailed process for building chatbots in HubSpot:
Step 1. Accessing HubSpot's Chatbot Builder
Connecting your chat channel with the conversations inbox is the primary step. It is where you can set the team availability and the widget appearance. Further, you must add tracking codes on external sites HubSpot does not host.
However, first, you must access your account and HubSpot chatbot builder.
- Log in to your HubSpot account.
- Select Conversations > Chatflows.
The command will guide you to the main Chatflows page. The Chatflow tool in HubSpot shows your active and existing chats.
Step 2. Creating a New Chatflow
Click the 'Create Chatflow' button in the upper right corner. There are two kinds of chatbot conversation flow design:
- Facebook Messenger
- Websites
Select the second option. The screen will show two options for creating chat flows in HubSpot once you click on it:
-
Live Chats
A live chat facilitates interaction between a user and you in real time. It features the 'Knowledge Base + Live Interact' option, allowing users to browse your published content.
-
Chatbots
Various chatbots are available to serve diverse functions. For instance,
- Lead Qualifying Bot: Accumulates information about users visiting your website.
- Offline Bot: It directs users to access assistance and start a chat.
- Ticket Bot: You can collect data on specific difficulties users encounter and generate a ticket to monitor the case.
- Technical Assistance Bot + Knowledge Base: It furnishes informative resources to users and connects them to a team member if needed.
- Meeting Bot: Users can easily schedule a meeting with you or your staff.
- Concierge Bot: It assigns users the appropriate information resource or department based on their requirements.
Select a template from the 'Build a Bot' section in the left sidebar and move to 'Next.' It will lead you to a new page where you can configure your mailbox and language settings.
Click 'Create' to proceed with the process.
Step 3. Building the Chatbot
Now is where the real work starts! You know the conversation flow, and you have the template. It is time to develop and customize a bot for your website.
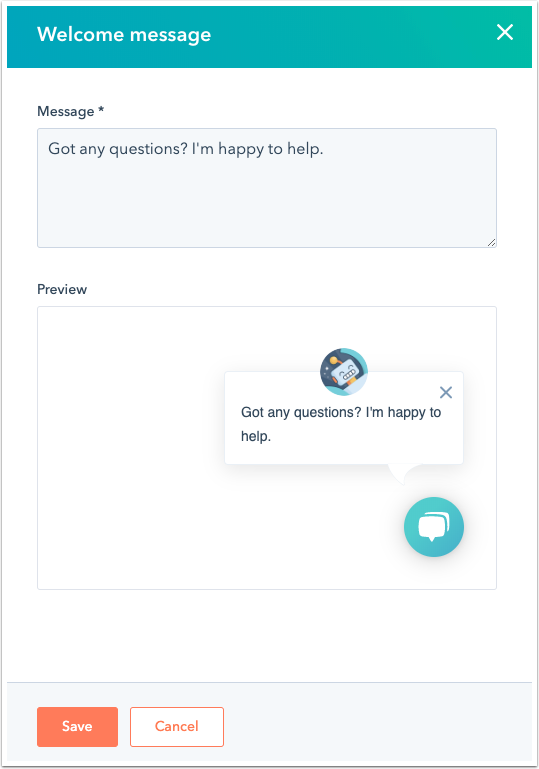
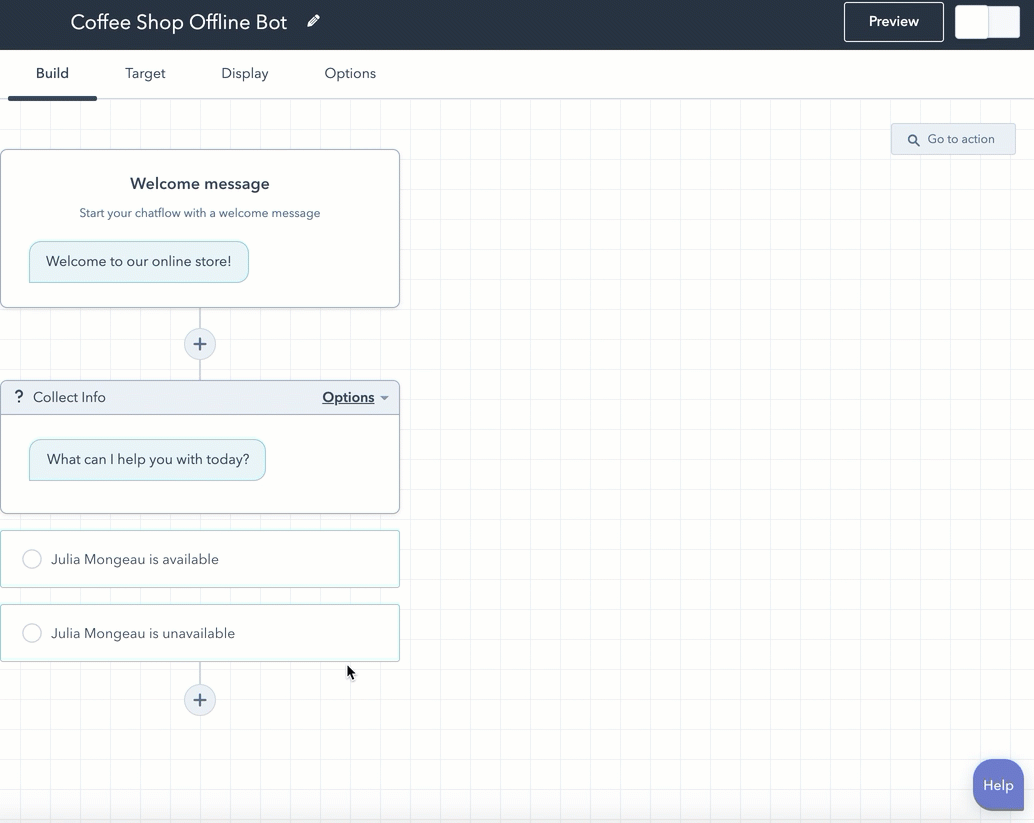
Create a Welcome Message
A welcome message is the first thing your users will see when they begin a chat. HubSpot offers pre-made templates to welcome your users. You can edit the message once you select a preferable template. Here are the steps to do the same:
- Click 'Welcome Message' to add a personalized greeting to your bot.
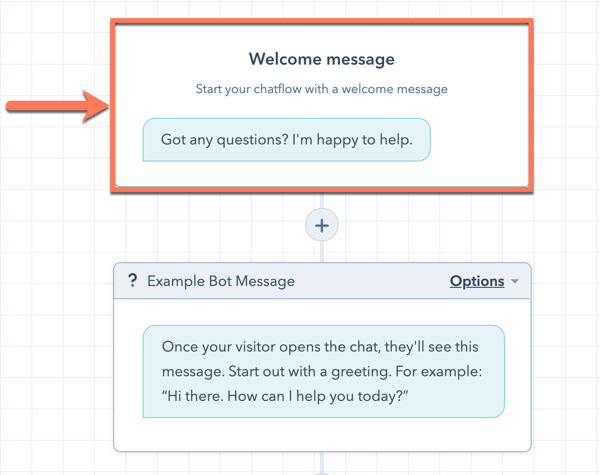
- Enter a message and click 'save.'
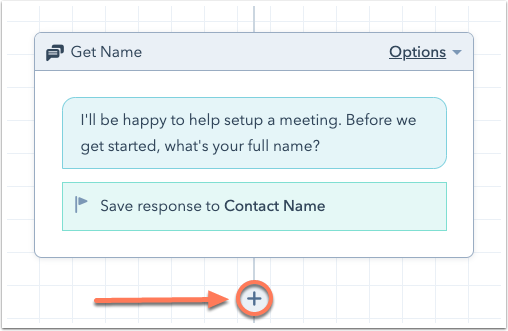
Add Bot Actions
You can use multiple Actions to collect information about a visitor. Actions like asking questions, sharing a knowledge base, or booking a meeting allow you to learn more about a user.
- Navigate to the 'Action' tab to alter how the bot responds.
- Tap the '+' icon to add more actions or questions.
- Select 'an action' to share the boy chat with the staff.

- Select 'Preview' to see how your bot will appear on your website.
- Click 'Save' at the bottom and hit 'Target.'
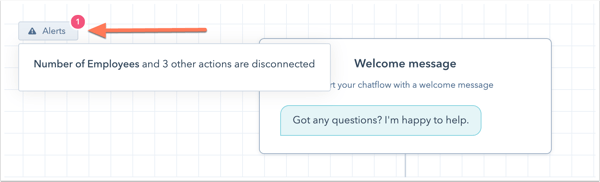
Activities may disconnect during editing. Click 'Alerts' in the top left to reconnect the actions and save once satisfied with the HubSpot chatbot customization.
Target
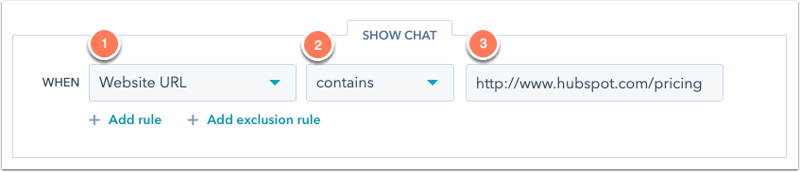
The Target tab enables you to make necessary settings for several options. You can decide when the bot will show on your website. There are two ways you can display your bot:
- On a specific website URL
- Open the first drop-down menu and click on the 'Website URL.'
- Click the second drop-down menu and choose a targeting rule.
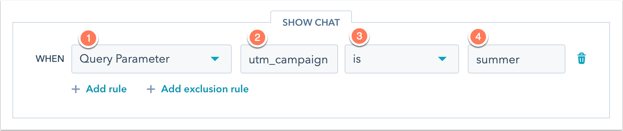
- On the Website URL, including specific query parameters
- Select 'Query Parameter' from the first drop-down menu.
- Enter the query parameter name in the first text field and pick a targeting rule.
- Enter the query parameter value in the second text field.
- Click the option 'Add Rule' to add a new rule for your bot display.
- To exclude the bot from certain pages (e.g. a privacy policy page), click Add exclusion rule.
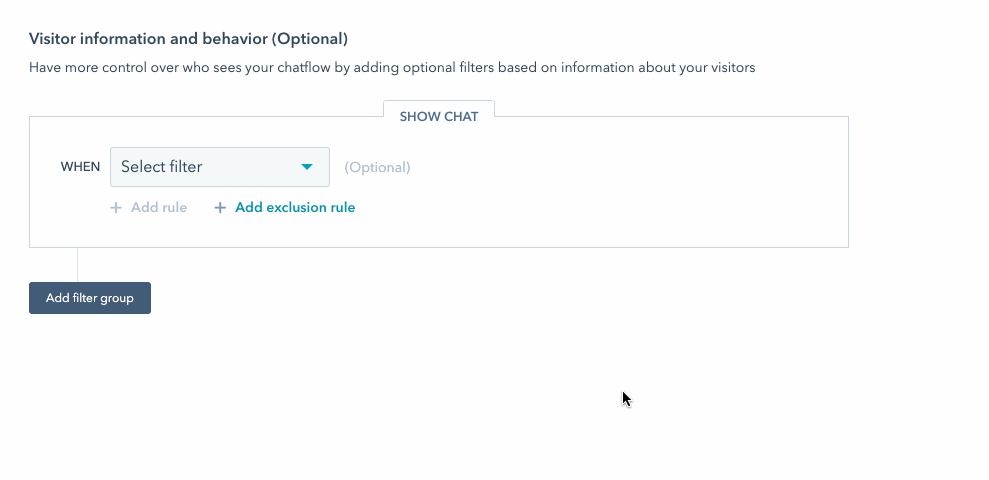
You can also target your bot to specific contacts based on known information about them. To set criteria based on visitor information, in the Visitor information section:
- Click the first dropdown menu and select a filter. You can use filters that specifically target known contacts or unknown visitors.
- Click the second dropdown menu and select your criteria.
- To add another rule, click Add rule.
- To exclude the pop-up form on certain pages (e.g. a privacy policy page), click Add exclusion rule.
- To create another filter group with additional targeting rules, click Add filter group.
- To continue, click Save at the bottom, then click the Display tab.
Personalize and edit the display settings for the chat heading and widget behavior. You can also select a specific time to load the chat widget.
- Click 'Triggers' and select the 'Checkbox' near the chat display trigger.
- Time on the page in seconds
- On exit intent
- Percentage of the page scrolled
- Select one of the options and 'Save.' Click the 'Options' tab to configure chatbot settings in HubSpot.
Step 4. Configuring Chatbot Settings
You have successfully built your chatbot. The Options tab will allow you to customize additional options, such as GDPR options, custom error messaging, and the display language.
General
At what time does the chat session restart? You can set a delay between each message sent to the visitor and add other customizations.
- Select the 'Typing delay between messages' menu and pick an option.
- Click the 'Session Timeout' to customize the time to restart a chat session.
- Type error messaging in the 'Generic error Message' tab to modify the response your user will see in case of a failed request.
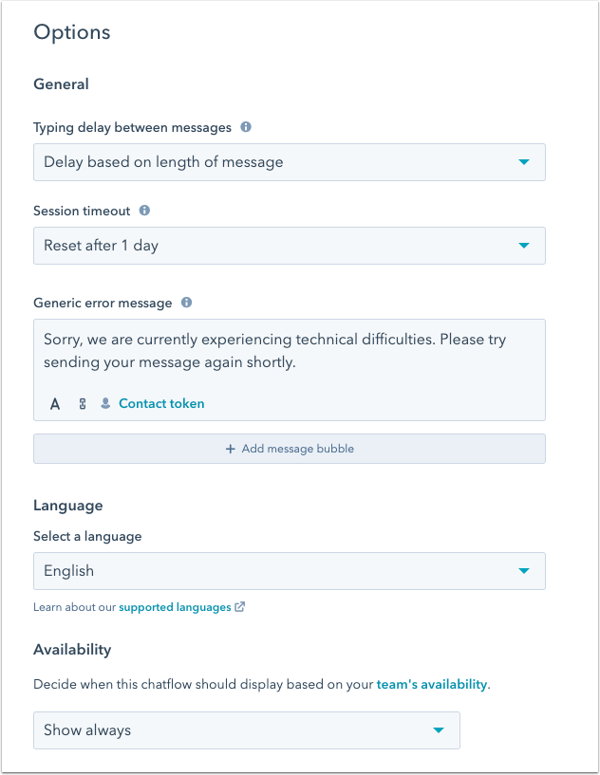
Language
HubSpot supports multiple languages. You can change the default English and choose the one that suits you.
- Click the 'Select a Language' menu.
- Select the language from the available options.
Availability
When do you want your bot to display on your page? You can decide when the chat widget will display based on your availability you set your channel settings.
- Select the 'Availability' menu.
- Choose the most suitable option from:
- Show always
- Only show when team members are available to chat
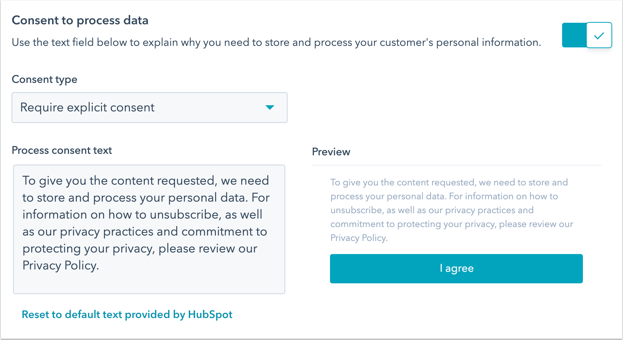
Data Privacy and Consent
You must seek consent before processing users' data. The steps to set up data privacy and support are as follows:
- Click to toggle 'Consent' to 'Collect Chat Cookies' to enable cookie consent text.
- Select when the consent banner should display.
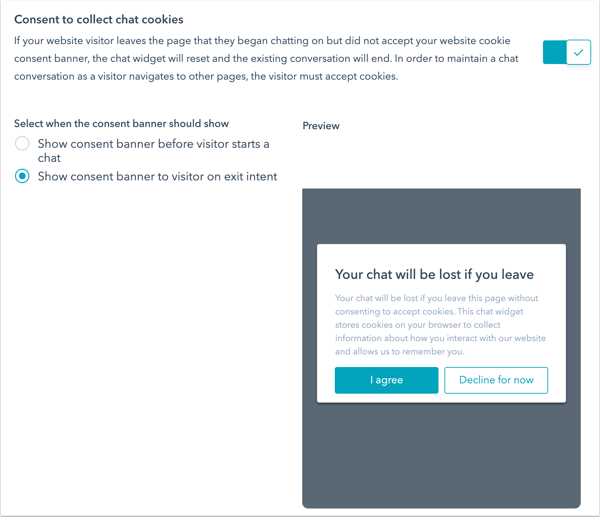
- Switch on the 'Process Data' option to capture visitors’ consent to process their data.
- Open the Consent Type drop-down menu and select the desired option.
- Legitimate Interest
- Require Explicit Consent
- You can edit the text a user sees when granting consent or keep the default text, click Reset to default text provided by HubSpot.
Step 5. Testing and Publishing the Chatbot
Testing chatbots in HubSpot is essential before it goes live. It is especially true if you are creating it for the first time. You would want to ensure your boy is robust and capable of handling any eventuality. You also want to make your tool user-friendly and easy to navigate.
HubSpot allows you to send a Customer Satisfaction Survey from within the widget. You can use it to collect feedback and evaluate your chat strategy before publishing chatbots in HubSpot.
- Click the Connect existing survey menu in the 'Collect feedback from chat visitors.'
- Select a survey or create a new one. Ensure you choose 'Chat' as the delivery method.
The survey will appear every time a chat ends. You can view the responses in the thread in the conversation inbox or on the survey details page.
- Make the relevant edits, if necessary, and click 'Save.'
- Choose 'Preview' in the upper right corner to test the functionality and setup.
- Move the toggle to add the bot to your website.
Creating an effective and responsive bot has never been easier! Building chatbots in HubSpot is an innovative opportunity to elevate customer interactions, streamline workflows, and drive business growth. The mentioned steps can help you develop, personalize, and optimize chatbots for success.
Frequently Asked Questions
Have a question in mind? We are here to answer.
Is HubSpot chatbot builder free?
![]()
Yes, HubSpot allows you to create chatbots for free. You can integrate the bot software with your CRM to deliver personalized and courteous service.
How does the HubSpot chatbot work?
![]()
The bot appears as a chat option on your website. It helps you interact with visitors, resolve their queries using automated responses, and qualify leads.
What makes the HubSpot chatbot unique?
![]()
It serves as a virtual assistant and delivers real-time support to customers. HubSpot enables you to automate conversations, respond instantly, and improve customer satisfaction.