
%201-1.webp?width=148&height=74&name=our%20work%20(2)%201-1.webp)


We’ve all been down that road. You mine the data carefully, create beautiful sets of reports swarmed with accurate, informative, and timely data, roll out your brand-new dashboard, and… get a goose egg! No one noticed it!
In the real world, the “if you build it, they will come” byword doesn’t necessarily stand true to your expert revops work - meaning your compelling new creation takes a backseat and, worse, stays under-appreciated. Thankfully, HubSpot’s dashboards and reports have untold features designed to quickly intensify your potential to share and highlight data with your team.
Herein, we will help you with every step to create and manage HubSpot’s dashboard and what you can do in terms of customization to build exactly what you need to stay organized across all its functionalities.
Let’s start!
Create a HubSpot Dashboard
Creating a new dashboard is a pretty easy process in HubSpot. Not just that, you can create a different one for different reporting purposes, share dashboards with other users in your account, and delete or clone existing dashboards to stay organized.
All you need to do is:
1. Log into your HubSpot account and navigate to Reports > Dashboards.

2. In the upper right corner, click “Create dashboard”, and you’ll be routed to the dashboard library.
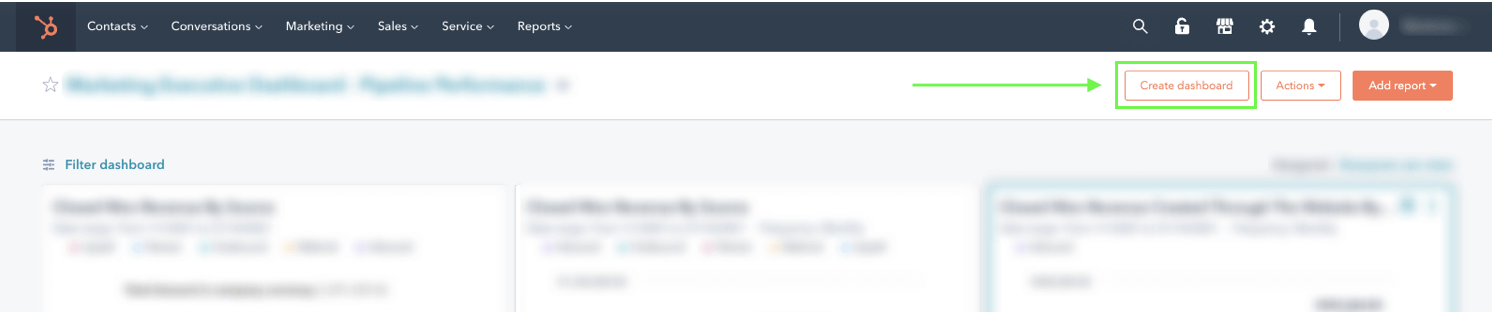
3. In the dashboard library, you can decide what you want to build.
You can choose to do one of the following:
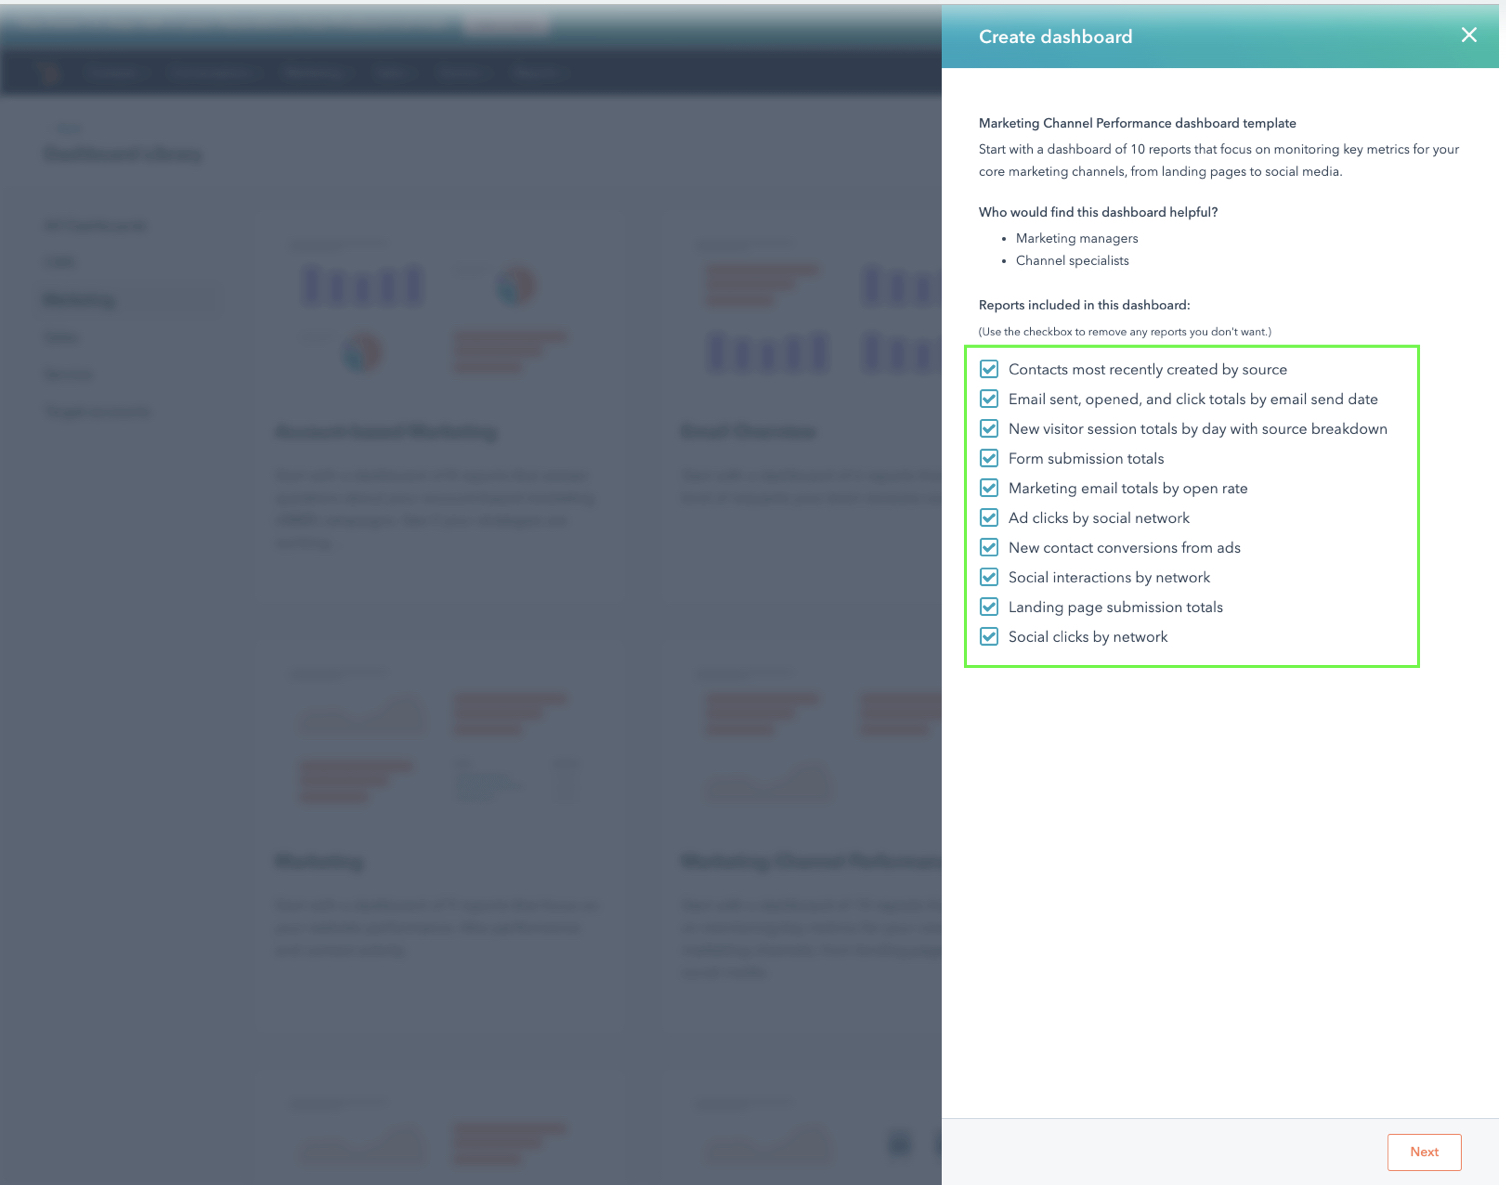
- Choose a pre-made dashboard template
---> Click the type of dashboard you want to create.
---> In the right panel, review the prescribed reports. Clear the checkboxes next to the reports you want to exclude.
---> Click Next.
- You can choose to create a blank dashboard with no reports
---> Click the blank dashboard from the main panel, give a name (e.g. test) choose the sharing settings and click Create a dashboard.
NOTE: The Dashboard name can’t contain a website URL or period.

You can choose to fill your blank dashboard with your reports, pre-made reports from the report library, or create new reports. Simply, click Add Reports to this dashboard in the screen center.
But if you want to skip the hassle and reinvent the wheel, another approach is to choose one of the premade dashboard templates.
HubSpot has already built numerous premade templates to address all your needs, categorized into different types, like:
- Marketing
- Sales
- Target accounts
- Service
- CMS
Besides, you can filter the templates based on types by choosing one of the types you need.

If you find a premade template you like, click on it, and a menu will appear where you can choose which report you would like to include.
- Click Next, give a name to the dashboard, and then define the user access to this dashboard.

- Private to Owner: This allows only your users and admins to view and edit the dashboard. A super admin can only choose if they are the owner of the dashboard.
- Everyone: Allow all users in your HubSpot account to view the dashboard.
---> Choose View and Edit to allow all users to view as well as edit the dashboard.
---> Choose View only to enable users to view, but no access to edit the dashboard.
- Only Specific Users and Teams (Enterprise only): This allows specific users and teams in your HubSpot account to view the dashboard.
---> Selecting View and Edit allows specific users to view and edit the dashboard.
---> Selecting View Only allows specific users to view, without access to edit the dashboard. Click Next in the bottom right and choose the users and teams that will have access to the dashboard.
Congrats! Your new dashboard is created and ready to show data.
Manage HubSpot Dashboard
Once you created the HubSpot Dashboard, you are all set to use it. You can view, filter, and analyze your data as per your needs. At any instance, you can manage your dashboard and perform specific configuration actions like:
- Change owner
- Delete the dashboard
- Set a dashboard to be your default
- Adjust the accessibility of the dashboard
- View Activity
- In your HubSpot account, navigate to Reports > Dashboards.
- In the upper right corner, click “Manage Dashboards”.
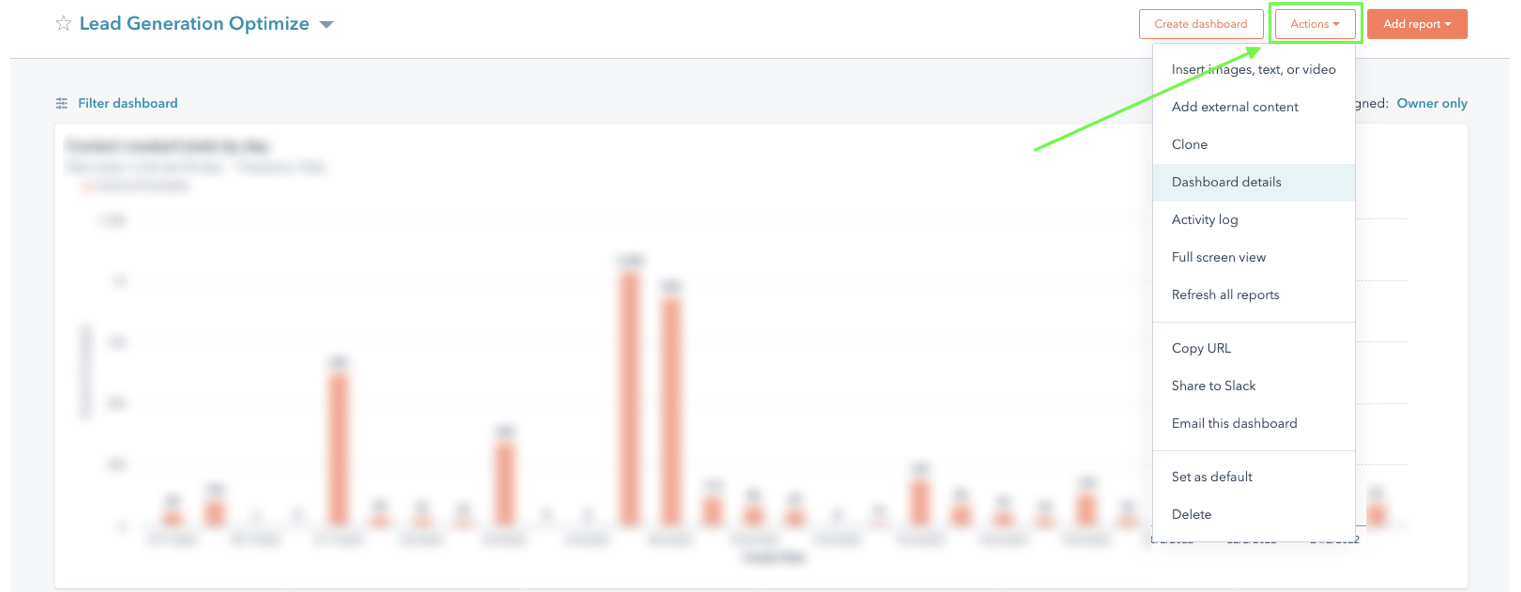
- To change ownership of a dashboard, set the dashboard as the default for the user, or delete a single dashboard hover over the dashboard you want to edit, and click the Actions dropdown menu. Choose an option:
- Clone: Choose to clone the existing dashboard. In the right panel, put the cloned Dashboard name and select the users who will have access to the cloned dashboard. Once selected, click Clone dashboard.
- Dashboard Details: From the drop-down menu, choose the new name of the new owner, edit the dashboard description, and click Save.

- Set as Default: In the dialog box, click Set as Default. This dashboard will be shown to you when you navigate to Reports > Dashboards.
- Delete a Dashboard: If you want to keep the custom reports in your reports list, in the dialog box, clear the “Also delete all reports in this dashboard” checkbox. To ensure the deletion, click “Delete dashboard”.
- Manage Access: In this panel, choose who has access to the dashboard - Private to the owner, Everyone, or Only Specific users and teams. Choose the users or teams and click Save.
To Bulk Delete Dashboards:
- Choose the checkboxes next to the dashboards you want to delete. In the table header, click Delete.
- In the dialog box, clear “Delete all reports as well” if you want to keep the custom reports in the dashboard in your report list.
- To ensure the deletion, click Yes, and delete the dashboard.
To Restore a Deleted Dashboard
- In the left sidebar, click Restore deleted dashboards.
- Choose the checkbox next to the dashboard you want to restore. In the table header, click Restore.
To Edit User's Access to a Dashboard:
- In the top right corner of the dashboard, next to assigned, click the current Assignment Permission, then click Edit Access.

- In the right panel, define the user access to the dashboard:
---> Private to Owner: This allows only your users and admins to view and edit the dashboard. A super admin can only choose this if they are the owner of the dashboard.
--->Everyone: This allows all users in your HubSpot account to view the dashboard.
- Choose View and Edit to share access with all users to view and edit the dashboard.
- Select View Only to allow all users to view, but not edit, the dashboard.
- Only Specific Users and Teams (Enterprise only): This allows specific users and teams in your HubSpot account to view the dashboard.
- Choose View and Edit to let specific users view and edit the dashboard. Click Next in the bottom right and select the users and teams that include access to view and edit the dashboard.
- Select View Only to allow specific users to view, but not edit the dashboard. Click Next in the bottom right and choose the users and teams that will have access to view the dashboard.
- Click Save
To add a dashboard to your list of favorite dashboard, click the favorite star icon next to the dashboard in your dashboard list. You can add up to 10 favorite dashboards.
View Activity in Your Dashboard
More than one user can have access and make changes to a dashboard. So, when you notice changes to a dashboard, you can view its activity log and understand who made the changes:
- In your HubSpot account, navigate to Reports > Dashboards.
- In the top left corner, click the dashboard name and choose the dashboard whose activity log you want to check.
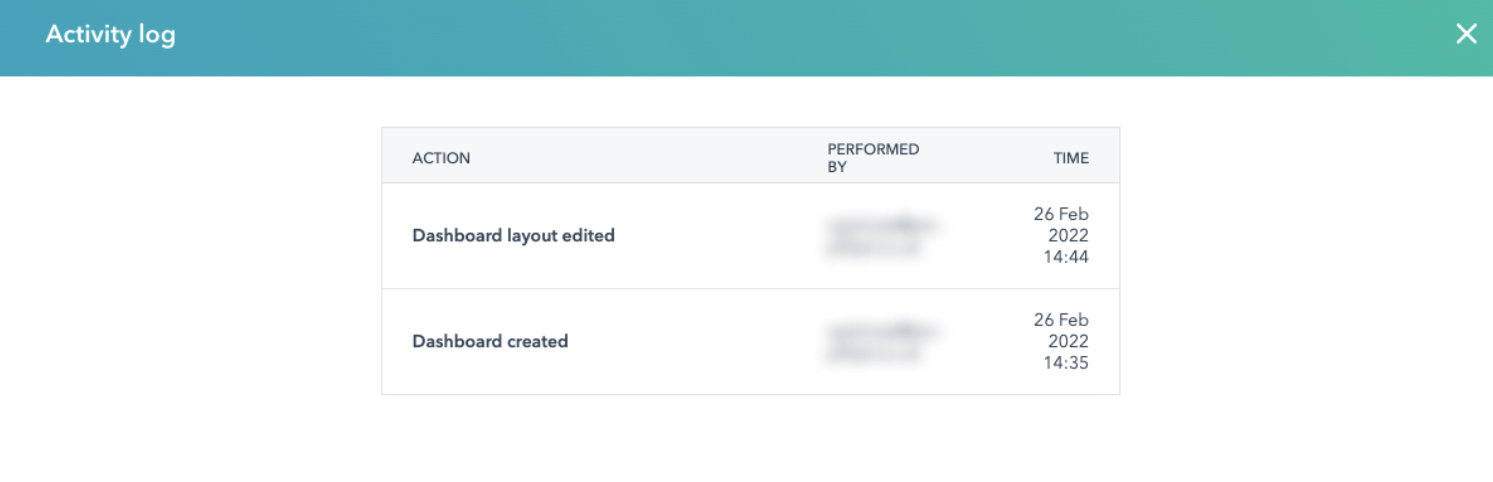
- In the top right corner, select the Actions dropdown menu and select Activity Log.
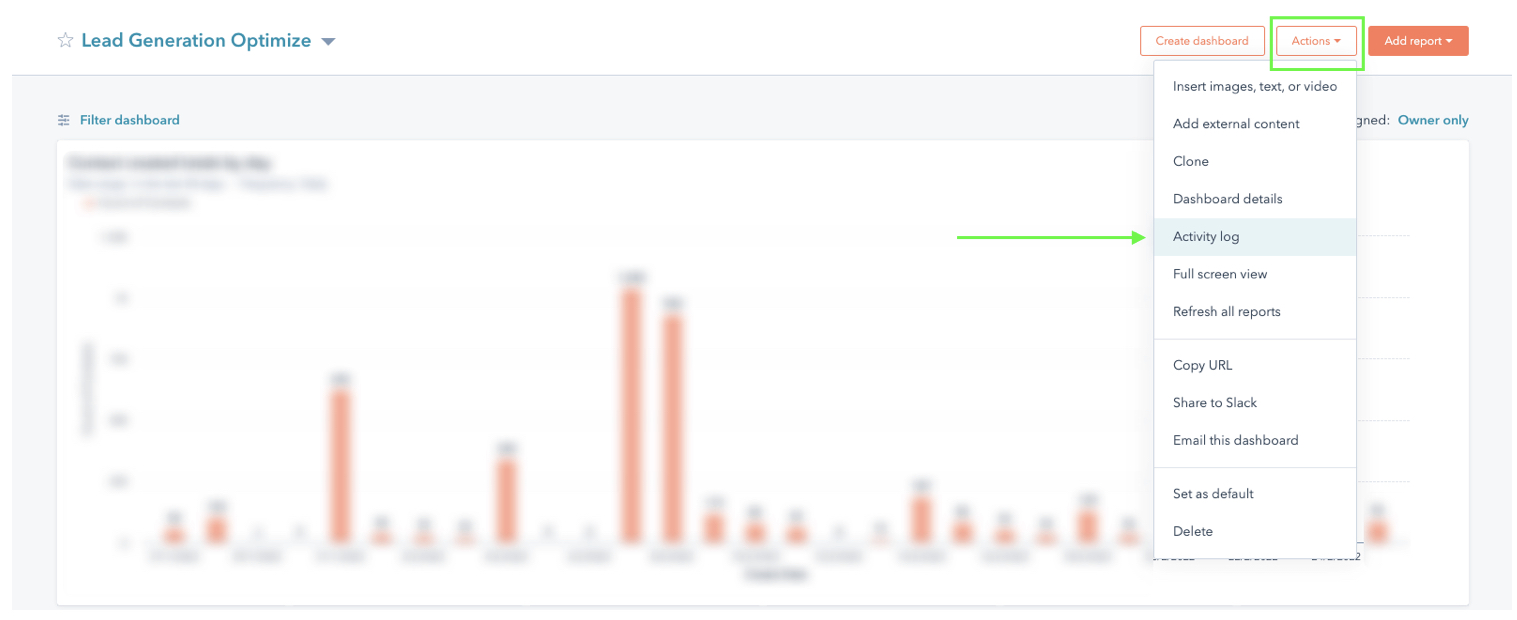
In the dialog box, you can see the changes made, the users who made the changes, and also the timestamps of each change made.
Finally, do you think the native HubSpot Dashboard is up to snuff for your project?
This article walks through all the different capabilities you have in HubSpot dashboards. We’ve seen how to create and manage a dashboard in your HubSpot account and much more to cater to all your needs.
Having said that, there are some scenarios where even these functionalities fall short. For instance, you want to include more reports in your dashboard but are confined by the plan limits, or maybe you want to combine several sources to have more context on your performance, and HubSpot data is not enough.
In this typical case, we suggest never putting in on the line for a specific tool or platform; indeed, combine everything to cater to your needs. Talk to experts to know what to do today while future-proofing the steps for tomorrow.


.jpg?width=352&name=_Choose%20the%20Best%20HubSpot%20Consulting%20Services%20(1).jpg)


