%201-1.webp?width=148&height=74&name=our%20work%20(2)%201-1.webp)


Forms are essential tools for gathering crucial information about your website visitors and contacts. With HubSpot, you can easily create forms to capture valuable data that will help you engage with your audience effectively.
Creating forms in HubSpot is a quick and easy process, regardless of whether you want to generate leads, gather client feedback, or offer support. This article will guide you through each step of setting up and managing forms in HubSpot, allowing you to quickly start gathering useful data.
- Log in to your HubSpot account and go to Marketing > Lead Capture > Forms.
- Click "Create form" in the upper right corner.
- (Optional) Associate the form with a business unit if you have the Business unit add-on.
- Select your form type and click "Next."
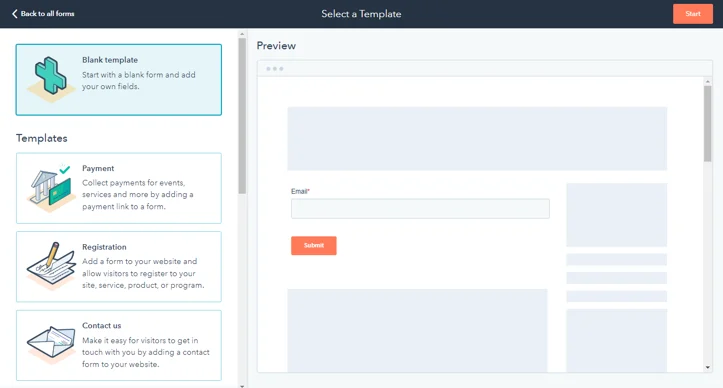
- Choose a Blank template or a pre-made template from the left panel.
- Click "Start" in the upper right corner.
Add and Edit Form Fields
Add form fields to collect information from visitors and contacts. Include rich text areas between fields for custom text, headers, or spacing.
For special fields like checkboxes, radio buttons, dropdowns, dates, file uploads, phone numbers, and blog subscriptions, explore additional customization options.
Note: The Email field is mandatory for form submissions to create contacts. HubSpot validates email addresses before submission. Learn about enabling form submissions without email addresses.
Caution: Forms cannot use Score, Calculation, or Rich Text properties.
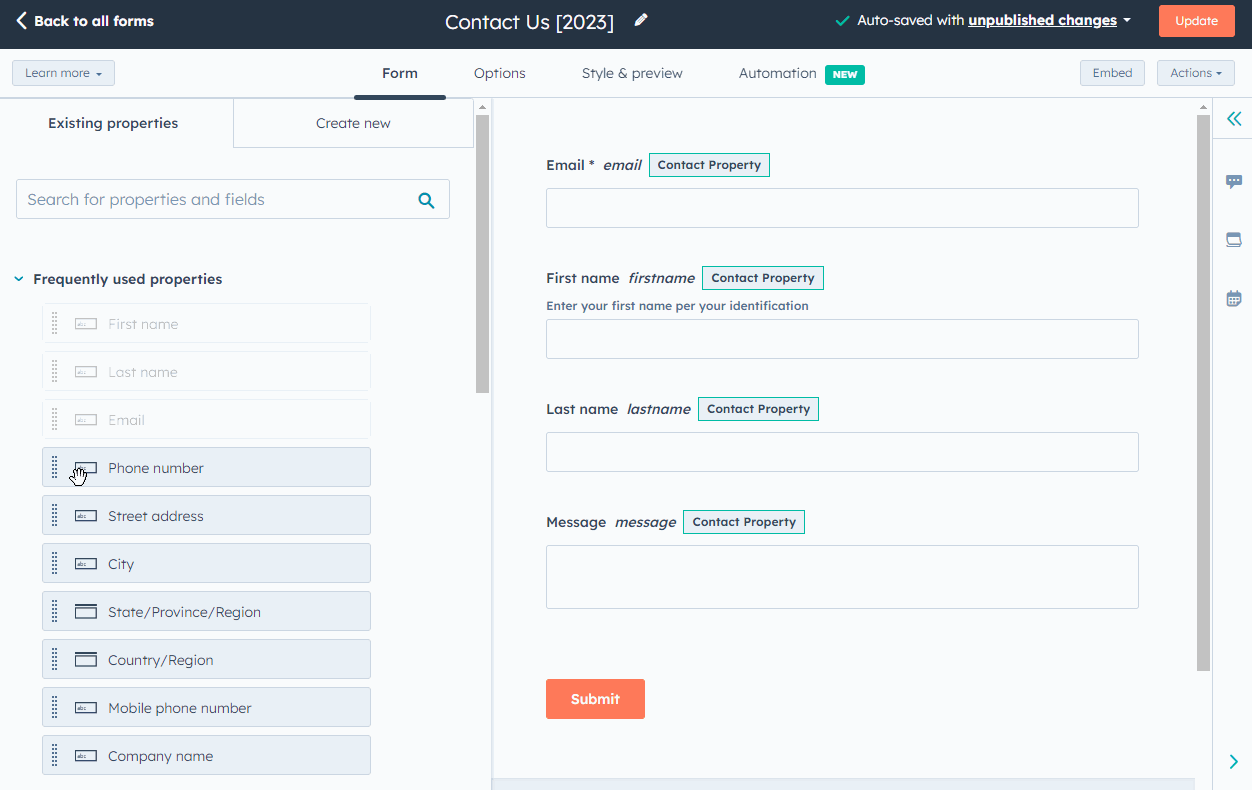
Add a New or Existing Form Field
To add a form field:
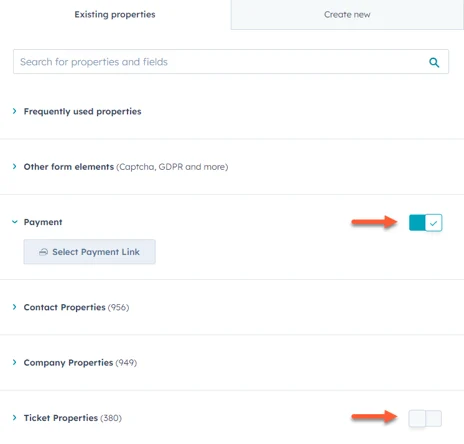
- In the left panel, use the search bar to search for an existing field or browse through property groups. The field's object type determines if form submissions appear on the associated records' activity timeline.
- To create a new property as a field, click the "Create new" tab.
Select the form field type. Checkboxes and Radio types offer multiple options, while Dropdown provides options within a dropdown menu.
In the Right Panel, Set Up the Form Field:
Object type: Choose from Contact, Company, Custom object fields, or Ticket properties (if Automatic ticket creation is enabled).
Group: Select a property group.
Label: Name the property.
Description: Add optional text to describe the property.
Click "Next" to proceed.
Review property options and click "Create."
- Drag and drop fields onto the form preview on the right to include them. Place fields above, below, or next to each other as needed.
Note: If you have the payments tool enabled, you cannot create tickets from the same form. Toggle on "Automatic ticket creation" to connect the form to the conversations inbox for customer inquiries. However, with this option enabled, you cannot collect payments from the same form.
Manage your form field's options
To edit a field's options:
- In the right panel, click the field in the form preview.
- In the left panel, customize the field's options as needed.
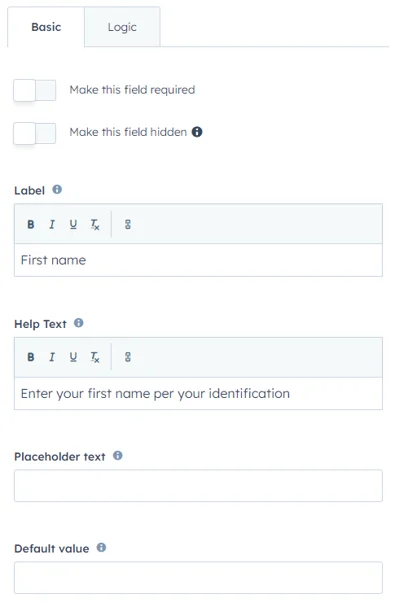
Basic tab options:
Label: Name displayed on the form.
Help text: Informational text below the label to assist visitors.
Placeholder text: Text inside the input box, vanishes when visitors input data.
Default value: The field's default value (can be changed by visitors).
Make this field required: When checked, the field must be completed for form submission (can't be hidden).
Make this field hidden: When checked, the field is invisible but can still pass values to contact properties.
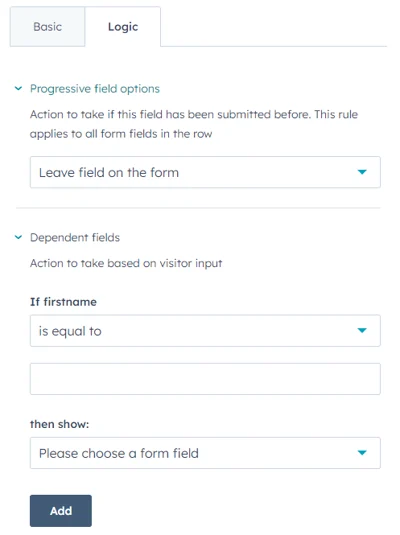
Logic tab options:
Progressive fields: Choose action if the field has been submitted before. Dependent fields: Display additional fields based on responses to a previous field.
Customize your Form Options
From the Options tab, you can configure what happens after a form is submitted. Some key options include:
Thank You Message or Redirect: Choose to display a thank you message or redirect visitors to another page after form submission. This applies to non-HubSpot pages or standalone forms.
Set Lifecycle Stage: Select a lifecycle stage for new or existing records when visitors submit the form. The form's lifecycle stage will override the default setting in your HubSpot account.
Follow-up Notifications: Enable sending submission email notifications to the contact's owner. If no owner exists, no notifications are sent.
Form Language: Select the language for default field labels and error messages displayed to visitors.
Campaign Association: Associate the form with a specific campaign in HubSpot.
Create New Contacts: Choose to create a new contact record for every submission with a unique email address. You can update existing contact details if the email matches.
Pre-populate Fields: Enable pre-population of known field values for contacts who previously visited your site and submitted a form.
Marketing Contacts: Automatically set contacts created from this form as marketing contacts if your account has access to marketing contacts.
Reset Form Link: Allow visitors to reset the form and create a new contact by clicking the provided link. This disables cookie tracking during submission.
By customizing these options, you can enhance the user experience and streamline your data management process.
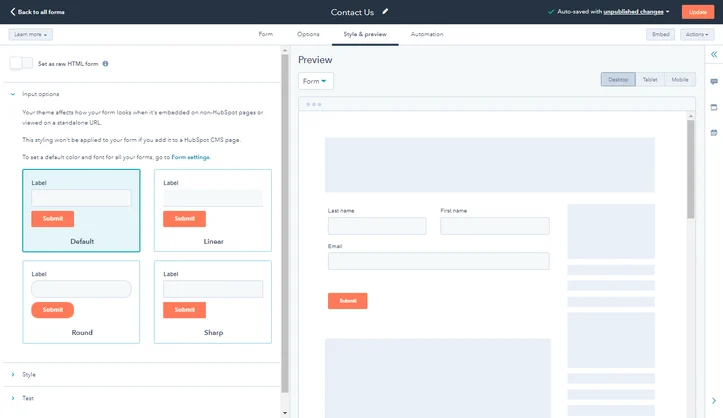
Style and Preview Your Form
From the Style & Preview tab, you can customize your form's appearance. Here's what you can do:
- Raw HTML Form: Choose this option for Marketing Hub or CMS Hub Pro/Enterprise subscriptions to render the form as raw HTML, removing HubSpot styling. Style the form with CSS in your external stylesheet.
- Input Options: Select from four available themes for field and button styles.
- Style: Customize the form's field width, fonts, and colors.
- Test: If your form has progressive or dependent fields, you can test how they'll appear to visitors.
With these customization options, you can ensure your form matches your branding and delivers a seamless user experience.
Automating Forms with HubSpot
Utilize automation features to streamline form processes:
- Send follow-up emails or automatic internal notifications to contacts.
- Set up simple workflows triggered by form submissions.
- Click the "Automations" tab at the top to configure post-submission actions.
Customize settings in the "Choose what happens after a form is submitted" section.
Create simple workflows to automate actions like sending emails or updating contact properties.
Publishing Your Form in HubSpot
- In the top right corner, click "Publish" to make your form live on HubSpot pages.
- Embed the form on external websites or share it as a standalone page.
- Once published, the form cannot be unpublished.
- On external pages, remove the form embed code to disable it.
- To disable standalone forms, delete the form.
After publishing, analyze form submission data to gain valuable insights.