%201-1.webp?width=148&height=74&name=our%20work%20(2)%201-1.webp)


Developing and designing in the HubSpot CMS is awesome, but if you are looking for how to set up a local development environment for HubSpot theme development, we got you covered!
Firstly, let’s understand what it means by local development.
A local development environment lets you set up a server environment on your machine, rather than using the server environment given by the HubSpot CMS. This allows you to personalize your website without worry that it’ll break or make all the changes you want, before pushing your website online.
So, let’s dive deeper and understand how to set up that. If you still need a quick brush-up of basic knowledge of development in general, here’s some handy material to help you get up to speed.
(XXXXXXXX)
(XXXXXXXX)
Ready to leverage HubSpot’s design tools?
HubSpot offers the capability to create components like Custom apps, CMS Content Themes, Landing pages, Marketing emails, etc locally with your favorite IDE (Integrated Development Environment Software) and command line tools of choice, which as a HubSpot developer, makes us happy!
Herein, we’ll learn how to connect your favorite IDE (IE: Sublime, Visual Studio, Eclipse, etc) with HubSpot so that you can easily create your HubSpot components with utmost flexibility, that too locally!
Let’s Start!
There are a handful of prerequisites you should keep in mind:
- To create and manage your personalized landing pages, email templates, custom apps, etc, you should be either an Enterprise Customer or HubSpot Marketing Hub. and, if you are not one of these, Don’t worry, Get In Touch with us and we will be happy to set you up!
- You should have an IDE of your choice installed on your computer, like Visual Studio, Sublime, Atom, etc.
- It’s important to install Node.js and other related elements needed by HubSpot. Plus, you may need administrator privileges.
These are the Steps, We Follow to Start Developing HubSpot Components Locally:
- Install Node.js and Version Manager.
- Switch to Node.js v12.x as a HubSpot requirement.
- Create your project’s working directory.
- Connect your project to HubSpot CLI.
Let’s go through each step comprehensively
#Step 1: Install Node.js and Version Manager
Firstly, it’s important to ensure that you have Node.js installed accompanied by NPM (Node Package Manager) and NVM (Node Version Manager). For this post, we will set up the environment using Mac OS Monterey. But, if you set up the environment on a Windows machine, you have to install Node.js in a different manner than discussed here. Here’s a recommended read to be able to install Node.js on a Windows machine easily.
Here, our approach for installing Node.js on Mac (or Linux) is to use the Homebrew package manager. Though there are numerous other methods to install Node, this is often considered the simplest method as it is a command-line tool that lets you install, update, and remove software with a single command.
To begin, ensure that Homebrew, aka brew, is installed.
/bin/bash -c "$(curl -fsSL https://raw.githubusercontent.com/Homebrew/install/master/install.sh)"
Follow the command prompts to step ahead with the installation of Homebrew on your machine.
|
This command will install Homebrew to your default prefix, usually which is /usr/local. |
And, once you have brew available, go ahead and install Node.js.
Brew install node.
Luckily, this would install both Node and Node Package Manager together. Now, you’ll be able to run node -v and npm -v to see the present versions of both node and npm installed. And, if by any chance an issue arises, a bit of Googling will help you troubleshoot where the installation went wrong. Often, permissions are the culprit!
#Step 2: Shift to Node.js v12.x as HubSpot Requirement
Make sure you have Node Version Manager installed.
This will let you easily shift between different versions of Node.js depending on the project you are working on. As already known, different types of Node apps need different versions, especially HubSpot needs Node.js v12.x.
curl -o- https://raw.githubusercontent.com/nvm-sh/nvm/v0.39.1/install.sh | bash
Once you run this command, you’ll need to close your ongoing terminal session and open a new one to run the following command to validate your installation:
nvm -v
If you want to shift to the latest version of the 12.x series, use the following Node Version Manager commands.
nvm install 12
nvm use 12
|
If you already have nvm installed along with other versions of Node.js, you can be specific with the version number in the previous commands. |
#Step 3: Creating Project’s Working Directory
Choose a directory on your device that feels comfortable to you to set up your HubSpot project. For example, run mkdir local-cms-dev in the command line, to create a directory. Next, run cd local-cms-dev to navigate to the directory.
You are ready to get the HubSpot CLI installed. This is the last bit before progressing with HubSpot's local development.
npm install -g @hubspot/cli
Congratulations! The foundation has now been set to set-up your HubSpot project!
#Step 4: Configure Your Project to HubSpot CLI
From the command line within your project’s folder, run the following command.
hs init
This command will walk you through the below steps.
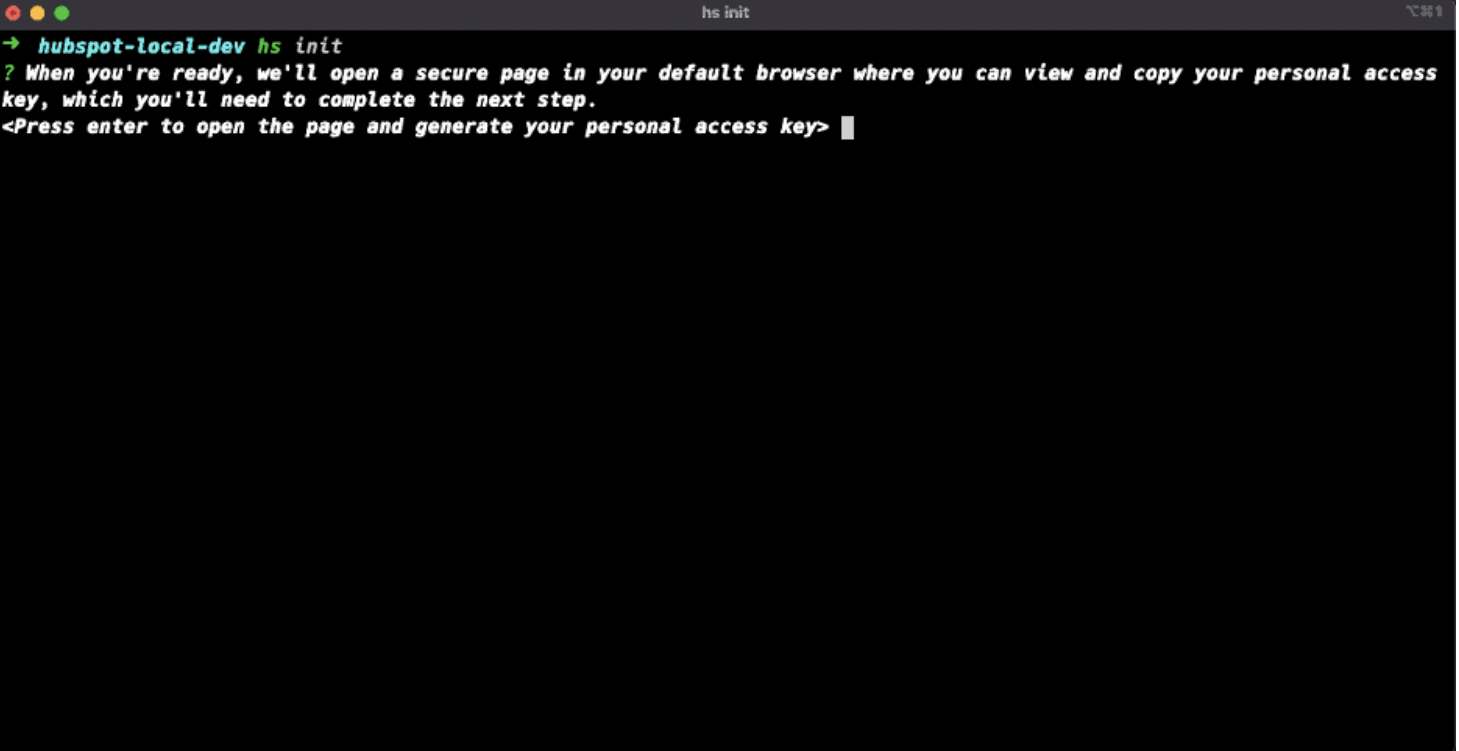
- When prompted, press the “Enter” key to open hubspot.com to the personal access key page of the account. In cases where you have multiple accounts, you’ll be prompted in the browser to choose an account first. Choose “Continue with this account”.

- Next, the page will ask you which permissions you want to enable for your local project. By default, all are chosen. Select your permissions as recommended and click “Generate personal access key”.
|
If you are generating a key for the first time, choose which scopes the key has access to. At a bare minimum, you’ll need to choose “design manager” permission to use the account's design tool. |

- Once the key has been created, copy its value by first choosing “Show” under the key, and then pressing “Copy”.
- Paste the key in the command line, and press “Enter”.
- Next, you’ll be prompted to give a name to reference your HubSpot account. Notably, the account name can’t include spaces or special characters other than dashes and underscores.
- A success message would appear to let you know that a config file, hubspot.config.yml has been created in your present working directory that links HubSpot with your new project.
In The End
We hope this content piece has helped provide you with the knowledge and tools you need to use HubSpot to its full capacity.
If any of this seems rocket science to you, partner with a reliable agency to help you personalize and leverage HubSpot to its full potential. We are here to discuss the best approach suited for your project.
Are you still sitting at square one? Let us help you!